Visual Studio Code 中的 FastAPI 教程
FastAPI 是一个现代、高性能的 Web 框架,用于使用 Python 构建 API。它旨在轻松快速高效地构建 API,同时提供自动验证、序列化和 API 文档等功能,使其成为构建 Web 服务和微服务的热门选择。
在本 FastAPI 教程中,我们将使用 FastAPI 创建一个杂货清单应用程序。在本教程结束时,您将了解如何在 Visual Studio Code 终端、编辑器和调试器中使用 FastAPI。本教程不是 FastAPI 的深入探讨。有关详细信息,您可以参考 官方 FastAPI 文档。
如果您是第一次使用 Python,我们建议您先学习我们的 Python 教程,以熟悉该语言和 VS Code 的 Python 支持。本教程更适合已经熟悉 Python 并想了解如何在 VS Code 中使用 FastAPI 的用户。
本 FastAPI 教程的完整代码项目可在 GitHub 上找到:python-sample-vscode-fastapi-tutorial。
如果你有任何问题,可以在 Python 扩展讨论问答中搜索答案或提问。
设置项目
您可以通过多种方式为本教程设置您的项目。我们将介绍如何在 GitHub Codespaces 和 本地 VS Code 中进行设置。
GitHub Codespaces
您可以将此项目设置为在 GitHub Codespaces 中开发,在那里您可以在 codespace 中远程编码、调试和运行您的应用程序。Codespace 提供了一个完全配置的、托管在云中的开发环境,无需本地设置。此环境包括项目的依赖项、工具和扩展,确保了持续且可复现的开发体验。它通过提供实时编辑、集成版本控制以及对调试和测试工具的轻松访问,同时保持项目的安全性和可靠性,从而简化了协作。
注意:所有 GitHub.com 帐户在免费版或专业版套餐中都包含每月免费使用 GitHub Codespaces 的配额。有关更多信息,请访问 有关 GitHub Codespaces 的计费。
要为此教程设置 codespace,请导航到 此项目的 GitHub 存储库。此 codespace 包含快速开始 FastAPI 开发所需的所有必要配置和依赖项。
在本教程中,请选择 dictionarybased 分支
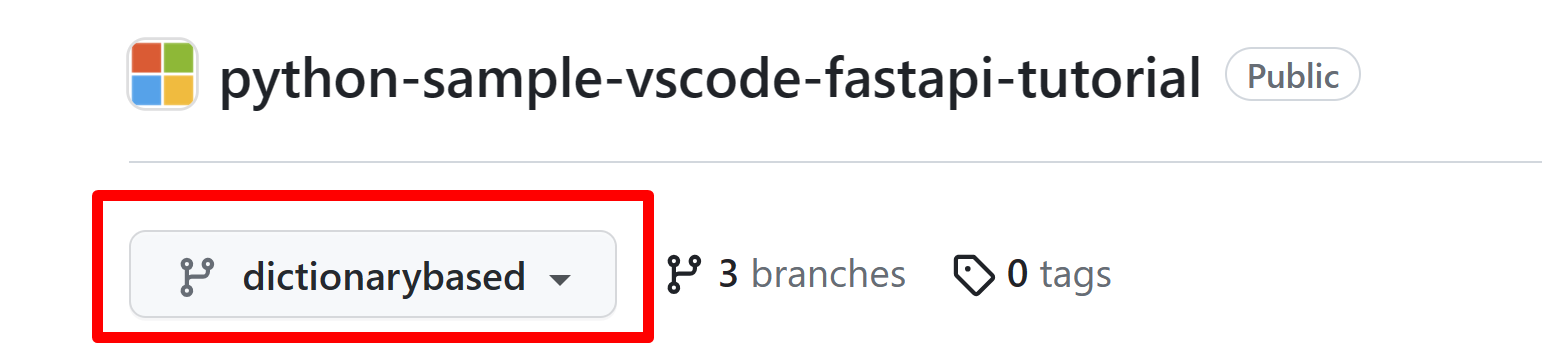
然后,选择 Code > Codespaces > Create Codespace on <dictionarybased> 分支来创建和打开项目的 codespace。
完成后,您可以继续阅读下面的 替换数据库 部分。
本地 VS Code 中
要在 VS Code 中成功完成本教程,您首先需要设置 Python 开发环境。具体来说,本教程需要
- Python 3(如果您尚未安装,请参阅 安装指南)
- VS Code 的 Python 扩展(有关安装扩展的更多详细信息,您可以阅读 扩展市场)。
在本节中,我们将创建一个文件夹作为 VS Code 中的工作区打开,设置一个 Python 虚拟环境,并安装项目的依赖项。
-
在您的文件系统中,为本教程创建一个项目文件夹,例如
groceries-plugin。 -
在 VS Code 中打开此新文件夹(文件 > 打开文件夹…)。
-
当出现 工作区信任提示时,选择 是的,我信任作者 以允许工作区访问必要的资源和扩展。您可以在 文档中了解有关工作区信任的更多信息。
现在,让我们创建一个 requirements.txt 文件,其中列出我们要为应用程序安装的依赖项。requirements.txt 文件是 Python 开发中的常见做法,用于指定项目依赖的库及其版本。此文件有助于确保任何参与项目的人都可以重现相似的开发环境,使其成为维护一致性的便捷组件。
我们将安装 FastAPI 用于创建应用程序,uvicorn 作为服务器,以及 Redis 和 type-redis 用于处理数据存储和与 Redis 数据库交互。
-
在 VS Code 中创建一个新文件(文件 > 新建文本文件 或 ⌘N(Windows、Linux Ctrl+N))。
-
向其中添加以下内容
fastapi redis types-redis uvicorn -
保存文件(⌘S(Windows、Linux Ctrl+S))并将其命名为
requirements.txt。 -
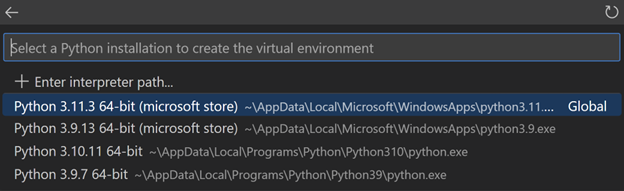
通过打开命令面板(⇧⌘P(Windows、Linux Ctrl+Shift+P))并运行 Python: Create Environment 命令来创建虚拟环境。
注意:此步骤可能需要几分钟才能完成。
-
当被问及环境类型时,请选择 Venv

-
然后选择您计算机上可用的最新版本 Python
-
从下拉列表中选择
requirements.txt文件,以便自动安装依赖项,然后选择 OK
虚拟环境将被创建,依赖项将被自动安装,并且该环境将被选为您的工作区供 Python 扩展使用。您可以通过查看 VS Code 右下角来确认它已被选中。

注意:如果您在状态栏中找不到新创建的环境信息,可以单击 Python 解释器指示符(或从命令面板运行 Python: Select Interpreter 命令)并手动选择虚拟环境。
开始编码
让我们来创建应用程序!
-
使用 文件 > 新建文件… 创建一个新的 Python 文件,然后选择 Python 文件。
-
将其保存为
main.py(⇧⌘S(Windows、Linux Ctrl+Shift+S)),位于groceries-plugin文件夹中。 -
将以下代码添加到
main.py并保存文件from fastapi import FastAPI app = FastAPI() @app.get("/") def root(): return {"message": "Hello World"} -
通过启动调试器(F5)来运行代码。
-
从下拉菜单中,从列表中选择 FastAPI 配置选项
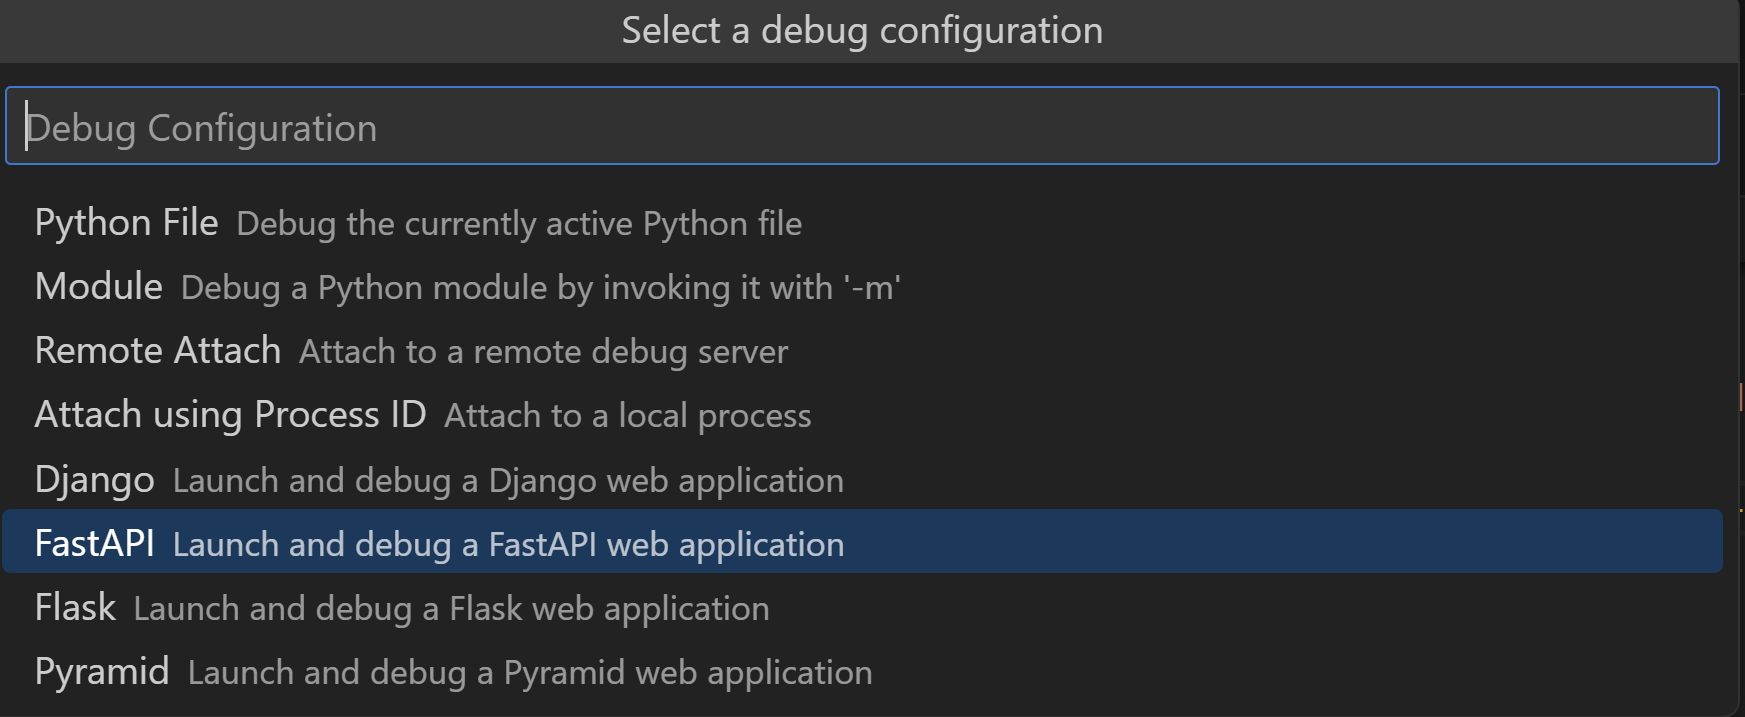
这将自动创建一个调试配置,通过调试器调用 uvicorn 来启动应用程序服务器,并允许您逐行代码进行检查,以了解其行为。您应该会在终端中看到类似以下内容

提示:如果您的默认端口已被占用,请停止调试器,打开命令面板(⇧⌘P(Windows、Linux Ctrl+Shift+P)),搜索 Debug: Add Configuration,选择 Python Debugger,然后选择 FastAPI。这将创建一个自定义配置文件
.vscode/launch.json,您可以对其进行编辑。将以下内容添加到"args":[]以设置自定义端口:"--port=5000"。保存文件,然后重新启动调试器(F5)。 -
在终端中按 Ctrl+Click
http://127.0.0.1:8000/URL,以在您的默认浏览器中打开该地址。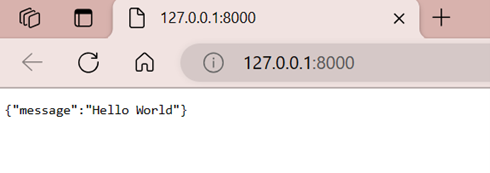
恭喜!您的 FastAPI 应用程序已启动并运行!
-
通过调试工具栏上的停止按钮,或通过 ⇧F5(Windows、Linux Shift+F5)停止调试器。
创建杂货清单项目的模型
现在我们已经成功运行了 FastAPI 应用程序,我们可以使用 Pydantic 来定义我们的杂货清单项目。Pydantic 是一个数据验证和解析库,可以与 FastAPI 无缝集成。Pydantic 允许您使用具有 类型提示的 Python 类来定义数据模型,以便自动验证和解析 API 请求中的传入数据(称为“payload”).
让我们为我们的杂货清单项目创建一个模型。我们将使用 ItemPayload 模型来定义要添加到杂货清单的项目的数据结构。此模型将包含三个字段:item_id、item_name 和 quantity。
-
使用 文件 > 新建文件… 创建一个新的 Python 文件,然后选择 Python 文件。
-
将以下行添加到文件中,然后将其保存在
groceries-plugin文件夹中,命名为models.py(⇧⌘S(Windows、Linux Ctrl+Shift+S))from typing import Optional from pydantic import BaseModel class ItemPayload(BaseModel): item_id: Optional[int] item_name: str quantity: int
Pylance,VS Code 中默认的 Python 语言服务器,支持类型提示功能,这有助于使用 Pydantic 模型和 FastAPI。这是因为 Pylance 构建在 Pyright 之上,Pyright 是 Python 的静态类型检查器,可以检测代码中的类型错误,从而防止 bug 并提高代码质量。
下面的三个步骤是可选的,但考虑到 FastAPI 广泛使用类型提示来提高代码的可读性和验证性,我们可以利用 Pylance 的类型检查功能来及早捕获错误。
-
打开设置编辑器(⌘,(Windows、Linux Ctrl+,))。
-
搜索“python type checking mode”,将其设置为
basic以进行基本类型检查。Pylance 现在将显示诊断和警告,以捕获简单的类型相关错误。或者,您可以将其设置为strict以强制执行更高级的 类型检查规则。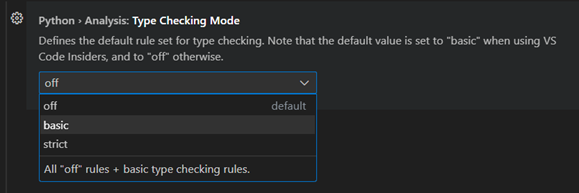
-
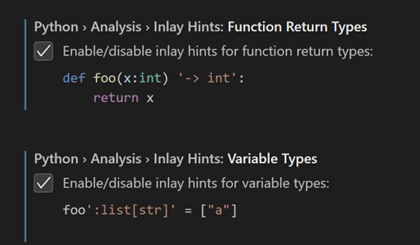
接下来,搜索“Python inlay type hints”,并为变量类型和函数返回类型启用内嵌提示。
创建路由
现在我们需要一个地方来存储杂货清单项目。为简单起见,让我们从一个空字典开始。
-
首先,让我们导入样本所需的所有包。打开
main.py文件并将第一行导入替换为以下几行。from fastapi import FastAPI, HTTPException from models import ItemPayload -
现在在
app = FastAPI()下方添加以下行。grocery_list: dict[int, ItemPayload] = {}这会创建一个新的空字典,它接收类型为
int(作为项目 ID)的键和类型为ItemPayload的值。我们现在将在 FastAPI 应用程序中定义路由。在 Web 应用程序的上下文中,路由就像是将特定 URL 映射到处理它们的代码的路径。这些路由是我们应用程序内不同功能的入口点。当客户端(如 Web 浏览器或其他程序)向我们的应用程序发送带有特定 URL 的请求时,FastAPI 会根据 URL 将该请求路由到相应的函数(也称为路由处理程序或视图函数),该函数处理请求并生成响应。
让我们继续定义用于添加和检索单个项目以及返回杂货清单中所有项目的路由。
-
将以下路由添加到
main.py文件末尾。# Route to add a item @app.post("/items/{item_name}/{quantity}") def add_item(item_name: str, quantity: int): if quantity <= 0: raise HTTPException(status_code=400, detail="Quantity must be greater than 0.") # if item already exists, we'll just add the quantity. # get all item names items_ids = {item.item_name: item.item_id if item.item_id is not None else 0 for item in grocery_list.values()} if item_name in items_ids.keys(): # get index of item_name in item_ids, which is the item_id item_id = items_ids[item_name] grocery_list[item_id].quantity += quantity # otherwise, create a new item else: # generate an ID for the item based on the highest ID in the grocery_list item_id = max(grocery_list.keys()) + 1 if grocery_list else 0 grocery_list[item_id] = ItemPayload( item_id=item_id, item_name=item_name, quantity=quantity ) return {"item": grocery_list[item_id]}如果您在上部分启用了类型提示,您可能会注意到 Pylance 会添加函数返回类型的内嵌提示,以及
item_ids和item_id的类型。您可以选择双击每个建议以将其插入代码。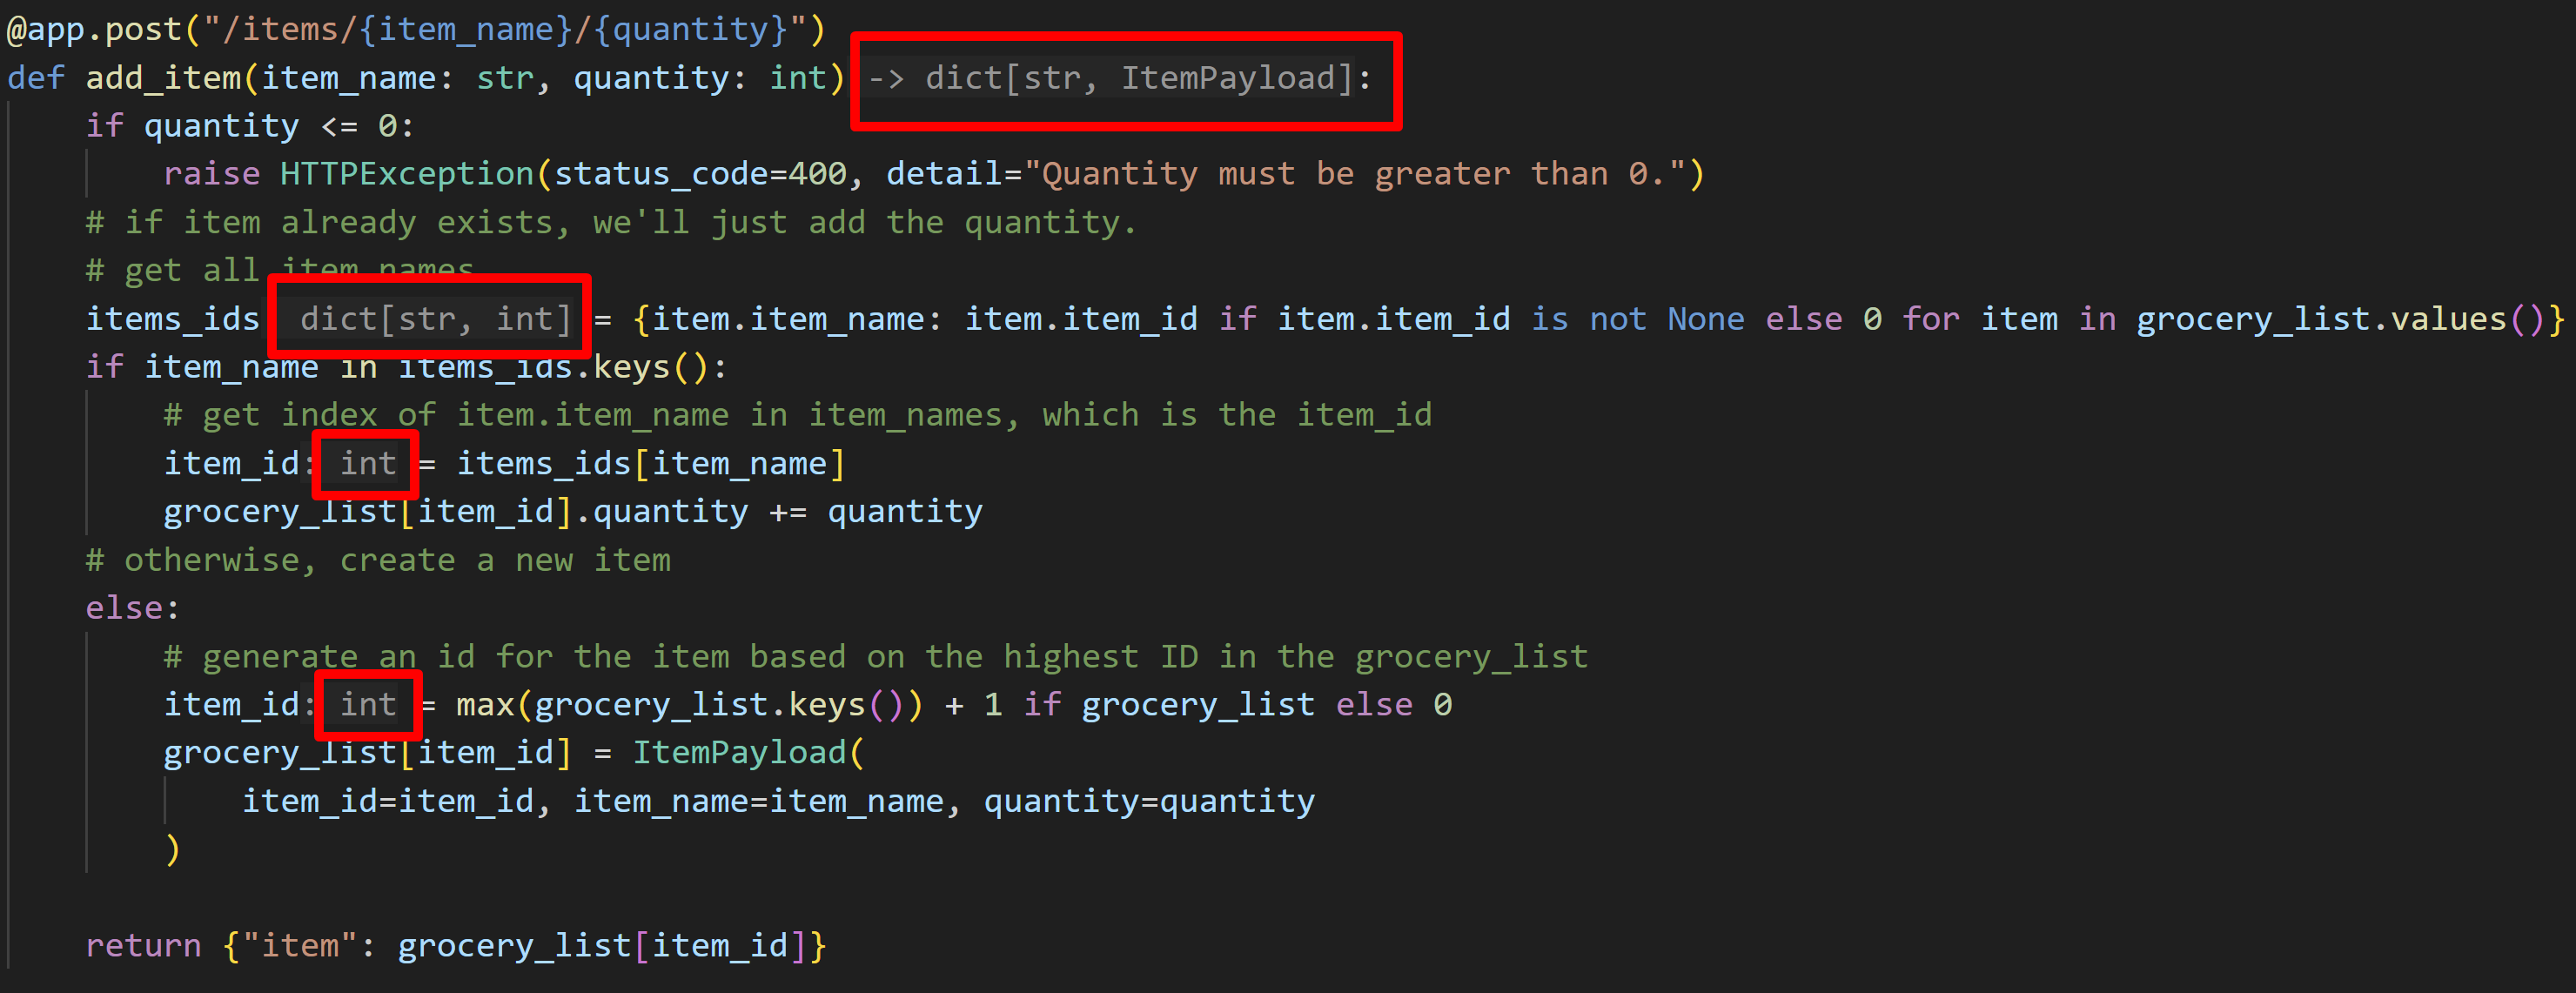
现在让我们检查此路由是否按预期工作。最快的方法是同时使用 VS Code 的调试器和 FastAPI 的
/docs端点,它提供了有关所有可用 API 路由的信息,并允许您与 API 交互以探索其参数和响应。此文档是根据 FastAPI 应用程序中定义的元数据和类型提示动态生成的。 -
在
if quantity <= 0语句旁边设置一个断点,方法是单击行号的左边距(或 F9)。调试器将在该行执行之前停止,因此您可以逐行检查代码。
-
启动调试器(F5),然后到浏览器中导航到
http://127.0.0.1:8000/docs。应该会出现一个 Swagger 界面,其中包含应用程序中的两个端点:
/items和根 (/)。
-
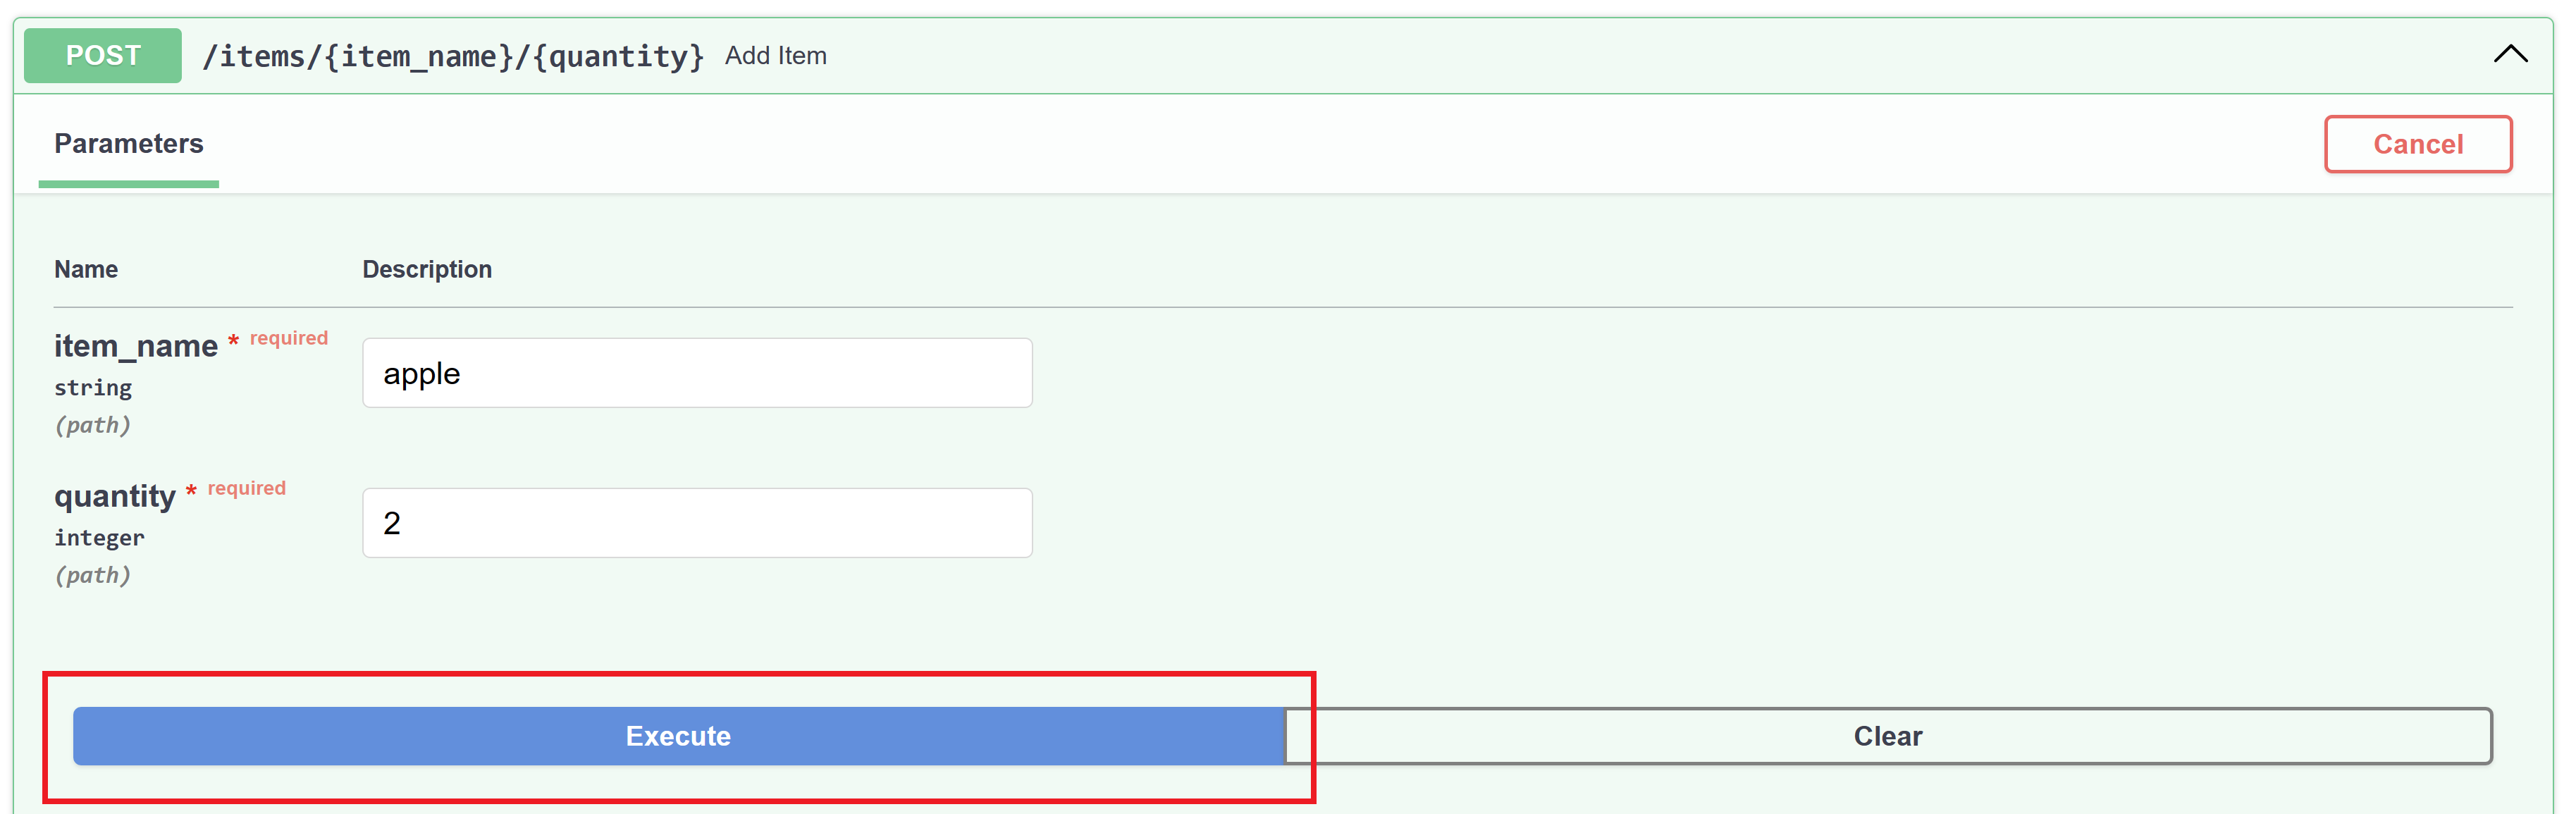
选择
/items路由旁边的向下箭头以展开它,然后选择右侧出现的Try it out按钮。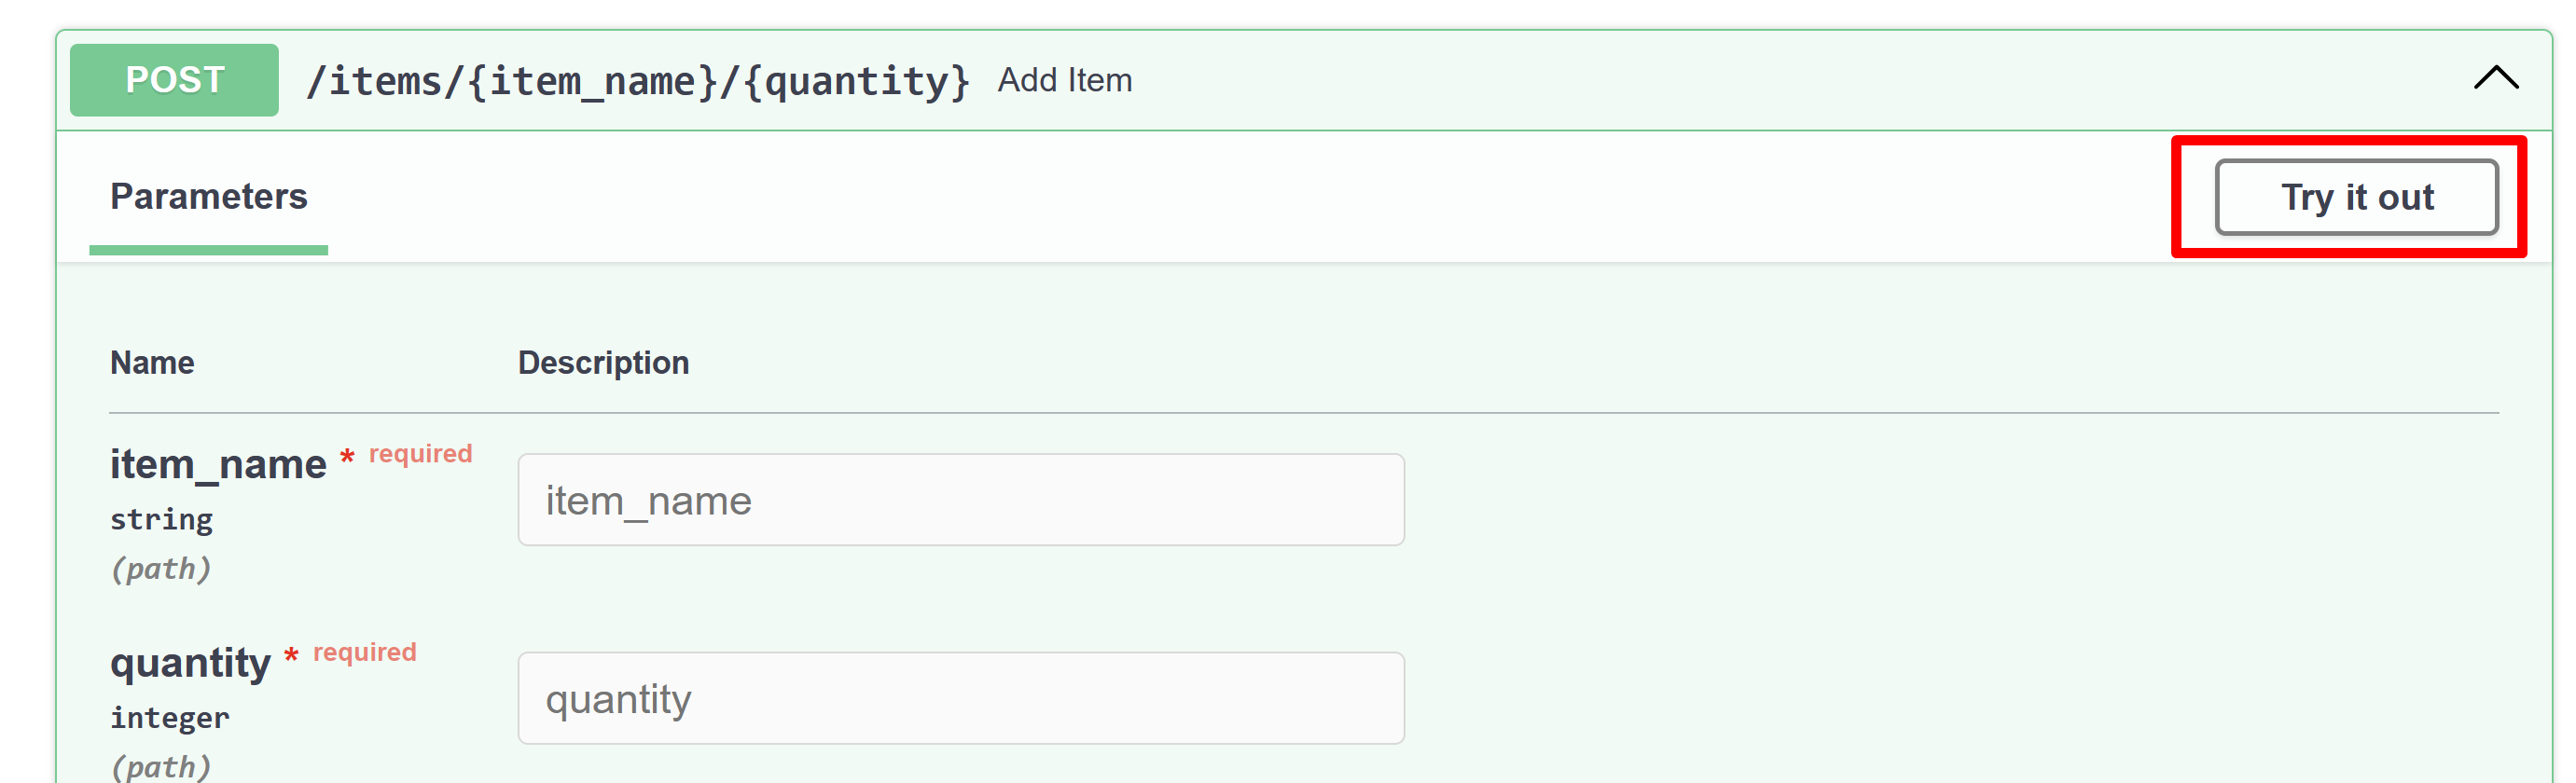
-
通过向
item_name字段传递一个字符串,向quantity字段传递一个数字来添加一个杂货清单项目。例如,您可以提供“apple”作为item_name,提供 2 作为quantity。 -
选择 Execute。
-
再次打开 VS Code,并注意调试器已在您之前设置的断点处停止。

在左侧,此时定义的所有局部和全局变量都显示在运行和调试视图下的变量窗口中。在我们的示例中,
item_name被设置为 'apple',quantity被设置为 2(在 locals 变量视图下),并且grocery_list字典为空(在 globals 变量视图下)。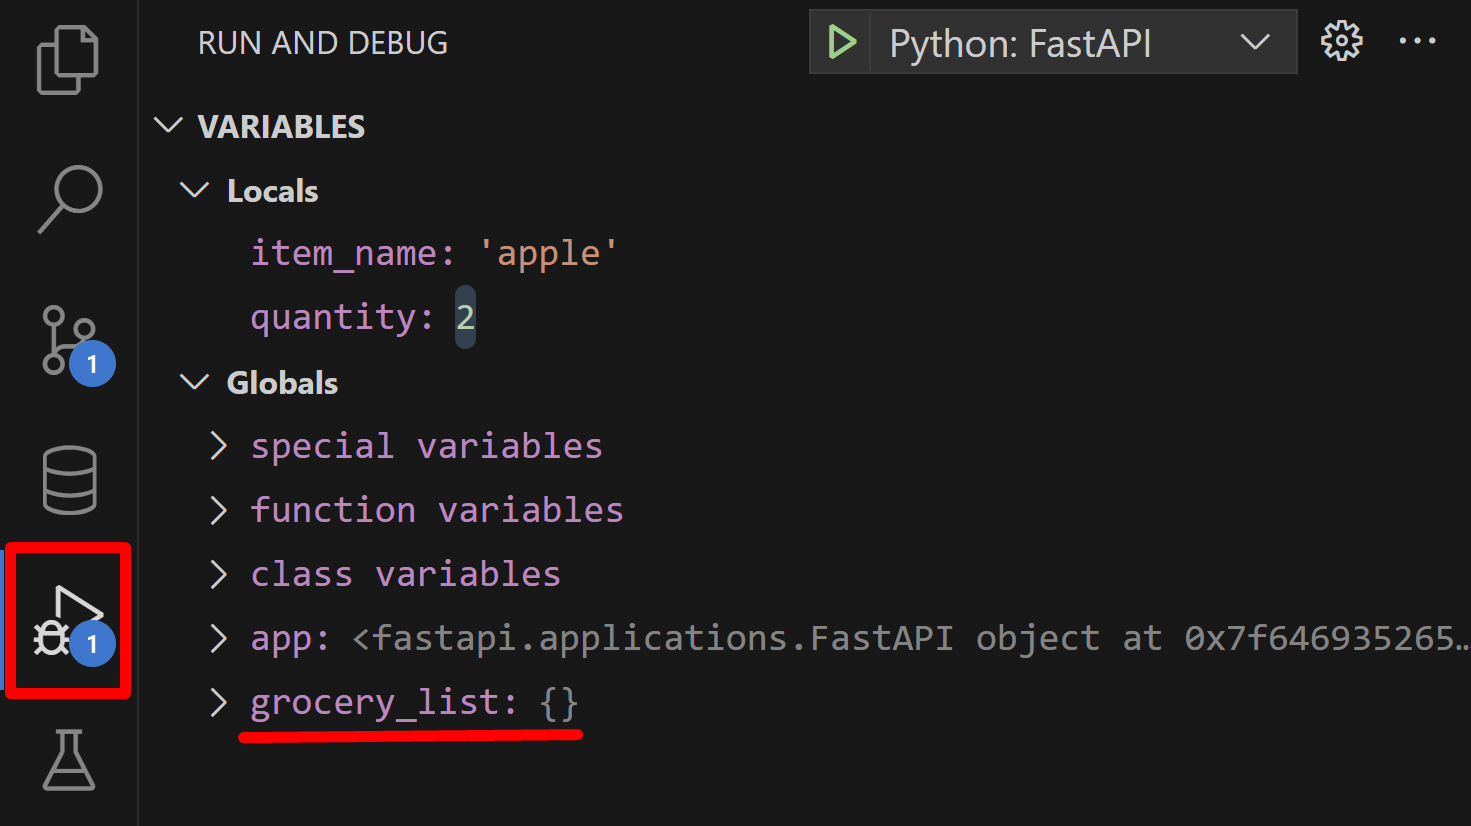
现在让我们使用 VS Code 的调试控制台进行一些探索。
-
选择
quantity <= 0语句,右键单击编辑器并选择 Evaluate in Debug Console。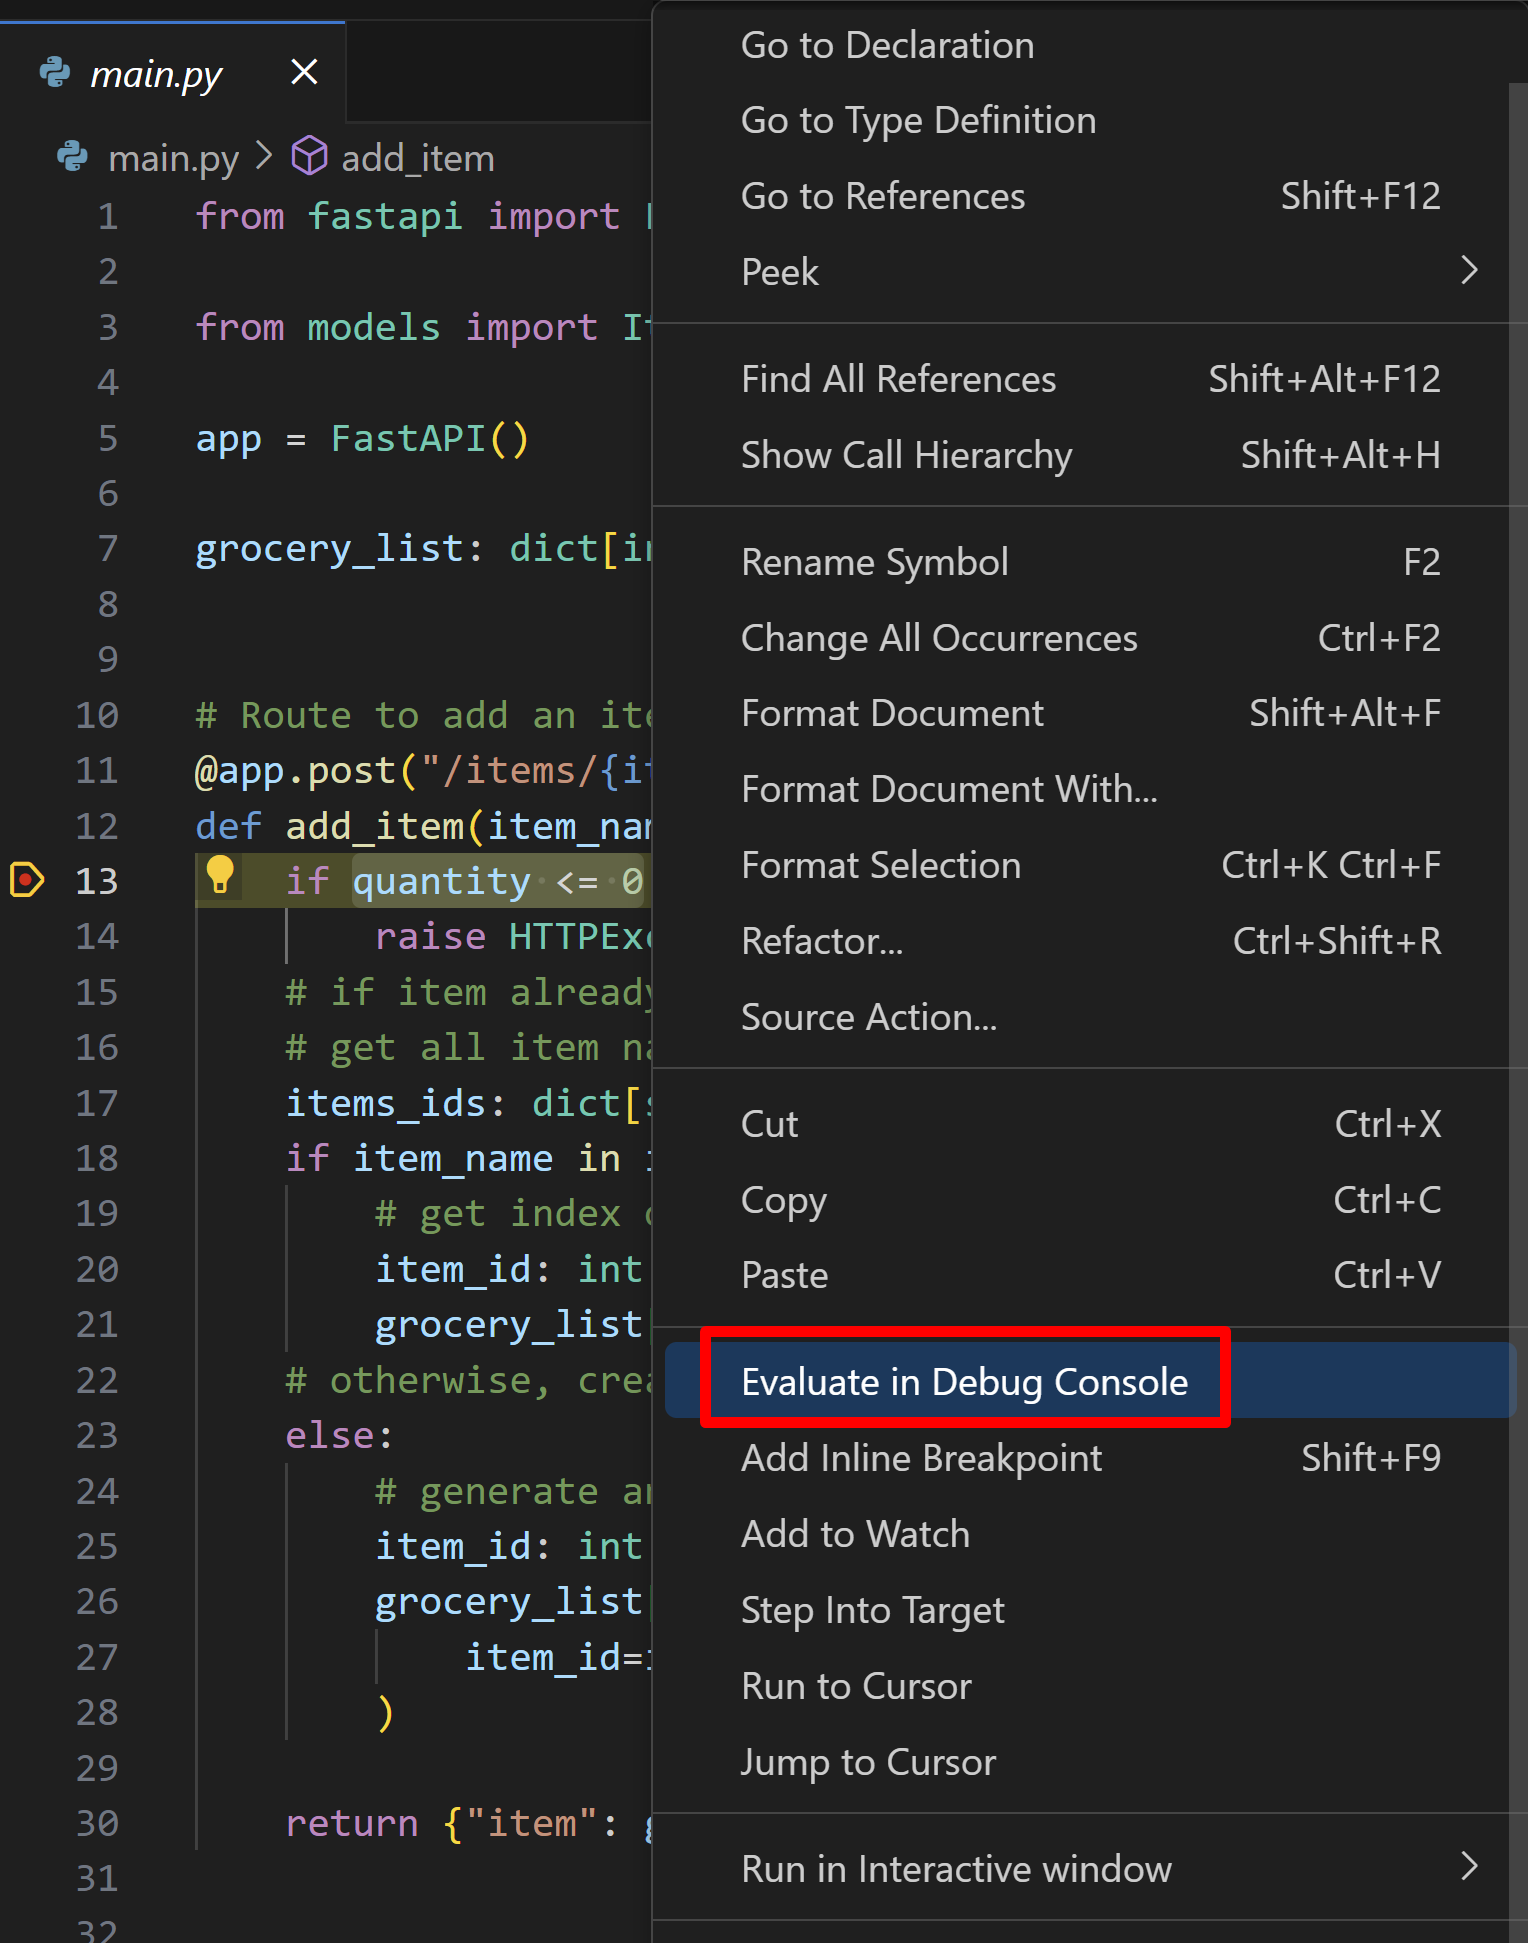
这将打开调试控制台并运行选定的表达式。正如我们在示例中预期的那样,表达式评估为
False。调试控制台可以是一个强大的工具,可以快速测试表达式并更好地理解代码在断点处的状态。您还可以使用它来运行任意代码,例如调用函数或打印变量。您可以在 Python 教程中了解有关 VS Code 中 Python 调试的更多信息。
您现在可以通过在调试视图工具栏中选择 Continue,或者按 F5 来继续执行代码。
最后,让我们为应用程序添加剩余的路由,以便我们可以列出所有项目或特定项目,以及从我们的杂货清单中删除它们。您可以让调试器保持运行,因为它会在您保存下一步所做的更改时自动重新加载应用程序。
-
将
main.py中的内容替换为下面的代码。from fastapi import FastAPI, HTTPException from models import ItemPayload app = FastAPI() grocery_list: dict[int, ItemPayload] = {} # Route to add an item @app.post("/items/{item_name}/{quantity}") def add_item(item_name: str, quantity: int) -> dict[str, ItemPayload]: if quantity <= 0: raise HTTPException(status_code=400, detail="Quantity must be greater than 0.") # if item already exists, we'll just add the quantity. # get all item names items_ids: dict[str, int] = { item.item_name: item.item_id if item.item_id is not None else 0 for item in grocery_list.values() } if item_name in items_ids.keys(): # get index of item_name in item_ids, which is the item_id item_id: int = items_ids[item_name] grocery_list[item_id].quantity += quantity # otherwise, create a new item else: # generate an ID for the item based on the highest ID in the grocery_list item_id: int = max(grocery_list.keys()) + 1 if grocery_list else 0 grocery_list[item_id] = ItemPayload( item_id=item_id, item_name=item_name, quantity=quantity ) return {"item": grocery_list[item_id]} # Route to list a specific item by ID @app.get("/items/{item_id}") def list_item(item_id: int) -> dict[str, ItemPayload]: if item_id not in grocery_list: raise HTTPException(status_code=404, detail="Item not found.") return {"item": grocery_list[item_id]} # Route to list all items @app.get("/items") def list_items() -> dict[str, dict[int, ItemPayload]]: return {"items": grocery_list} # Route to delete a specific item by ID @app.delete("/items/{item_id}") def delete_item(item_id: int) -> dict[str, str]: if item_id not in grocery_list: raise HTTPException(status_code=404, detail="Item not found.") del grocery_list[item_id] return {"result": "Item deleted."} # Route to remove some quantity of a specific item by ID @app.delete("/items/{item_id}/{quantity}") def remove_quantity(item_id: int, quantity: int) -> dict[str, str]: if item_id not in grocery_list: raise HTTPException(status_code=404, detail="Item not found.") # if quantity to be removed is higher or equal to item's quantity, delete the item if grocery_list[item_id].quantity <= quantity: del grocery_list[item_id] return {"result": "Item deleted."} else: grocery_list[item_id].quantity -= quantity return {"result": f"{quantity} items removed."} -
保存文件(⌘S(Windows、Linux Ctrl+S))。应用程序应自动重新加载。
您现在可以再次打开 /docs 页面,并测试新路由,使用调试器和调试控制台来更好地理解代码执行。完成后,您可以停止调试器(⇧F5(Windows、Linux Shift+F5))。您也可以通过单击来删除我们在第 4 步中添加的断点。
恭喜!您现在拥有一个可运行的 FastAPI 应用程序,其中包含用于向杂货清单添加、列出和删除项目的路由。
设置数据存储
此时,您已经拥有了具有基本功能的应用程序的可运行版本。本节将指导您完成数据存储的设置,以便持久化数据,但如果您对已学到的内容感到满意,可以选择跳过它。
到目前为止,我们正在将数据存储在字典中,这并不理想,因为应用程序重新启动时所有数据都将丢失。
为了持久化数据,我们将使用 Redis,它是一个开源的内存数据结构存储。由于其速度和多功能性,Redis 通常用作各种应用程序中的数据存储系统,包括 Web 应用程序、实时分析系统、缓存层、本教程等等。
如果您已经在GitHub Codespaces 中使用我们现有的模板进行开发,您可以直接跳到 替换数据库 部分。
如果您使用的是 Windows,可以通过设置 Docker 容器或 GitHub Codespace 来使用 Redis。在本教程中,我们将使用 Docker 容器,但您可以参考 上面的部分了解有关设置 GitHub Codespace 的说明。
否则,如果您使用的是 Linux 或 macOS 计算机,可以通过按照 其网站上的说明来安装 Redis,然后跳到 替换数据库部分。
在 Windows 上设置 Docker 容器
VS Code 的 Dev Containers 扩展提供了一种简化的方法,可以将项目、其依赖项以及所有必要的工具整合到一个整洁的容器中,创建一个功能齐全的开发环境。该扩展允许您在容器内部(或挂载到容器中)打开项目,然后在 VS Code 中使用其全部功能。
对于以下步骤,请确保您的计算机上已安装以下要求:
要求
创建 Dev 容器配置
-
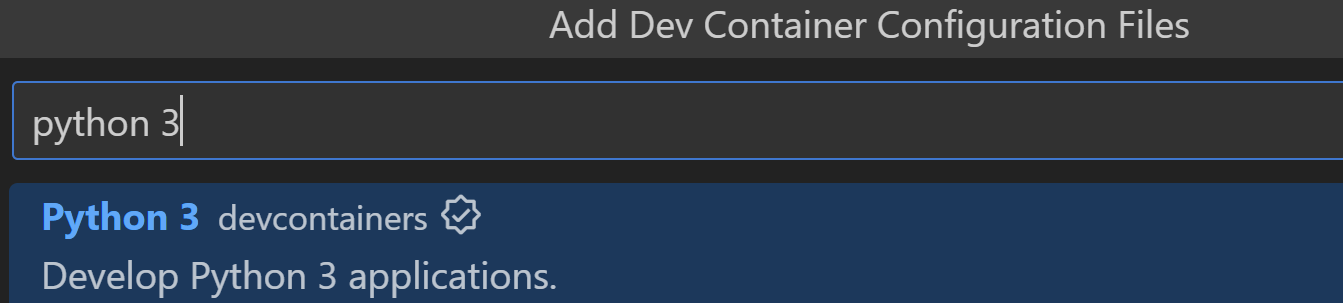
打开命令面板并运行 Dev Containers: Add Dev Container Configuration Files…。
-
选择 Python 3
-
选择默认版本。
-
选择 Redis Server 作为要安装的附加功能,按 OK,然后选择 Keep Defaults。
我们可以选择安装 Features 以包含在容器中。在本教程中,我们将安装 Redis Server,这是一个社区贡献的功能,它安装并添加了适用于 Redis 的正确开发容器设置。

这将会在您的工作区中创建一个
.devcontainer文件夹,其中包含一个devcontainer.json文件。让我们对该文件进行一些编辑,以便容器设置包括安装我们所需的 VS Code 扩展以及项目依赖项等步骤。 -
打开
devcontainer.json文件。 -
在
"features" : { ... }条目后面添加一个“,”,以便我们可以向文件添加更多设置。接下来,我们将在
devcontainer.json文件中的postCreateCommand属性中添加必要的依赖项安装命令,以便在容器设置完成后,我们的应用程序就可以运行了。 -
找到下面的内容并删除该行上的注释(
//),以便在容器创建后安装依赖项。"postCreateCommand": "pip3 install --user -r requirements.txt",您可以在 Development Containers Specification 中了解
postCreateCommand和其他生命周期脚本。现在我们将使用
customizations属性来添加我们希望安装在容器中的 VS Code 扩展。 -
将以下设置添加到
devcontainer.json。// Use 'postCreateCommand' to run commands after the container is created. "postCreateCommand": "pip3 install --user -r requirements.txt", // Configure tool-specific properties. "customizations": { "vscode": { "extensions": [ "ms-python.python", //Python extension ID "ms-python.vscode-pylance" //Pylance extension ID ] } } -
保存文件。
-
在右下角显示的通知中选择 Reopen in Container,或者从命令面板运行 Dev Containers: Reopen in Container 命令。
注意:根据互联网速度和机器性能,构建容器可能需要几分钟时间。
您可以在 Dev Containers 文档中了解有关开发容器配置的更多信息。
完成后,您将拥有一个完全配置的基于 Linux 的工作区,其中安装了 Python 3 和 Redis Server。
容器设置完成后,您会在 VS Code 左下角看到一个指示符。

注意:通过打开扩展视图(⇧⌘X(Windows、Linux Ctrl+Shift+X))并搜索 Python 和 Pylance 扩展,仔细检查它们是否已成功安装在容器中。如果没有,您可以通过运行 Install in Dev Container 来安装它们。
选定的 Python 解释器信息可在右下角的状态栏中找到,与 devcontainer.json 文件中指定的版本匹配。

注意:如果您在状态栏中找不到 Python 解释器信息,可以单击 Python 解释器指示符(或从命令面板运行 Python: Select Interpreter 命令)并手动选择容器中的 Python 解释器。
我们现在已准备好进入下一部分,届时我们将替换数据存储。
替换数据库
我们有一个存储杂货清单项目的字典,但我们希望用 Redis 数据库替换它。在本教程中,我们将使用 Redis hash 来存储我们的数据,Redis hash 是一种可以存储多个键值对的数据结构。
与传统数据库不同,您可以在不知道其 ID 的情况下检索项目,而在这里,您需要知道 Redis hash 键才能从中检索值。在本教程中,我们将创建一个名为 item_name_to_id 的 hash 来按名称检索项目,并将它们映射到它们的 ID。此外,我们将创建其他 hash 来按 ID 检索项目,并将它们映射到它们的名称和数量。每个项目 hash 都命名为 item_id:{item_id},并有两个字段:item_name 和 quantity。
首先,让我们开始用连接到 Redis 服务器的 Redis 客户端对象替换字典。
-
在
main.py文件中,将文件开头的grocery_list: dict[int, ItemPayload] = {}替换为下面的行。redis_client = redis.StrictRedis(host='0.0.0.0', port=6379, db=0, decode_responses=True)Pylance 会显示一个错误消息,因为尚未导入 Redis。
-
将光标放在编辑器中的“redis”上,然后单击显示的灯泡图标(或 ⌘.(Windows、Linux Ctrl+.))。然后选择 Add 'import redis'。

提示:您可以通过在设置编辑器(⌘,(Windows、Linux Ctrl+,))中查找Auto Import Completions 设置并启用它,来设置 Pylance 以自动添加导入。
我们现在有一个 Redis 客户端对象,它连接到本地主机(
host="0.0.0.0")上运行的 Redis 服务器,并监听端口 6379(port=6379)。db参数指定要使用的 Redis 数据库。Redis 支持多个数据库,在此代码中,我们将使用数据库 0,这是默认数据库。我们还传递了decode_responses=True,以便响应被解码为字符串(而不是字节)。让我们在第一个路由
add_item中进行一些替换。我们不再需要查看字典中的所有键来查找提供的项目名称,而是可以直接从 Redis hash 中获取该信息。我们假设
item_name_to_idhash 已经存在,将项目名称映射到它们的 ID(别担心,我们稍后会添加这段代码!)。然后,我们可以通过调用 Redis 的hget方法来获取请求中收到的项目名称的 ID,如果请求的名称已存在于 hash 中,则返回项目 ID,否则返回None。 -
删除带有以下内容的行。
items_ids = {item.item_name: item.item_id if item.item_id is not None else 0 for item in grocery_list.values()}并替换为
item_id = redis_client.hget("item_name_to_id", item_name)请注意,Pylance 会在此更改中报告一个问题。这是因为
hget方法返回str或None(如果项目不存在)。但是,我们尚未替换的代码下面的行期望item_id为int类型。让我们通过重命名item_id符号来解决此警告。 -
将
item_id重命名为item_id_str。 -
如果启用了内嵌提示,Pylance 应该会在
item_id_str旁边显示一个变量类型提示。您可以选择双击以接受它。
-
如果项目不存在,则
item_id_str为None。所以现在我们可以删除以下内容的行。if item_name in items_ids.keys():并替换为
if item_id_str is not None:现在我们有了项目 ID 的字符串形式,我们需要将其转换为
int并更新项目的数量。目前,我们的 Redis hash 只将项目名称映射到它们的 ID。为了也将项目 ID 映射到它们的名称和数量,我们将为每个项目创建一个单独的 Redis hash,使用"item_id:{item_id}"作为我们的 hash 名称,以方便按 ID 检索。我们还将为这些 hash 添加item_name和quantity字段。 -
删除
if块内的代码。item_id: int = items_ids[item_name] grocery_list[item_id].quantity += quantity并添加以下内容,将
item_id转换为int,然后通过调用 Redis 的hincrby方法来增加项目的数量。此方法会将其递增请求(quantity)提供的数量增加"quantity"字段的值。item_id = int(item_id_str) redis_client.hincrby(f"item_id:{item_id}", "quantity", quantity)现在我们只需要替换项目不存在时(当
item_id_str为None时)的代码。在这种情况下,我们生成一个新的item_id,为项目创建一个新的 Redis hash,然后添加提供的项目名称和数量。为了生成一个新的
item_id,让我们使用 Redis 的incr方法,传递一个名为"item_ids"的新 hash。此 hash 用于存储最后一个生成的 ID,因此每次创建新项目时都可以对其进行递增,确保它们都有唯一的 ID。 -
删除带有以下内容的行。
item_id: int = max(grocery_list.keys()) + 1 if grocery_list else 0并添加以下内容。
item_id: int = redis_client.incr("item_ids")当
item_ids键第一次运行此incr调用时,Redis 会创建该键并将其映射到值1。然后,每次运行时,它都会将存储的值增加 1。现在,我们将使用
hset方法将项目添加到 Redis hash 中,并提供字段(item_id、item_name和quantity)的映射,以及值(项目新生成的 ID 及其提供的名称和数量)。 -
删除带有以下内容的行。
grocery_list[item_id] = ItemPayload(
        item_id=item_id, item_name=item_name, quantity=quantity
    )
并替换为以下内容。
redis_client.hset(
            f"item_id:{item_id}",
            mapping={
                "item_id": item_id,
                "item_name": item_name,
                "quantity": quantity,
            })
现在我们只需要将新生成的 ID 映射到项目名称,方法是设置我们在开头引用的 hash,即
item_name_to_id。 -
将此行添加到路由末尾的
else块内。redis_client.hset("item_name_to_id", item_name, item_id) -
删除带有以下内容的行。
return {"item": grocery_list[item_id]}并替换为
return {"item": ItemPayload(item_id=item_id, item_name=item_name, quantity=quantity)} -
如果您愿意,可以尝试对其他路由进行类似的替换。否则,您可以将文件的全部内容替换为下面的行。
import redis from fastapi import FastAPI, HTTPException from models import ItemPayload app = FastAPI() redis_client = redis.StrictRedis(host="0.0.0.0", port=6379, db=0, decode_responses=True) # Route to add an item @app.post("/items/{item_name}/{quantity}") def add_item(item_name: str, quantity: int) -> dict[str, ItemPayload]: if quantity <= 0: raise HTTPException(status_code=400, detail="Quantity must be greater than 0.") # Check if item already exists item_id_str: str | None = redis_client.hget("item_name_to_id", item_name) if item_id_str is not None: item_id = int(item_id_str) redis_client.hincrby(f"item_id:{item_id}", "quantity", quantity) else: # Generate an ID for the item item_id: int = redis_client.incr("item_ids") redis_client.hset( f"item_id:{item_id}", mapping={ "item_id": item_id, "item_name": item_name, "quantity": quantity, }, ) # Create a set so we can search by name too redis_client.hset("item_name_to_id", item_name, item_id) return { "item": ItemPayload(item_id=item_id, item_name=item_name, quantity=quantity) } # Route to list a specific item by ID but using Redis @app.get("/items/{item_id}") def list_item(item_id: int) -> dict[str, dict[str, str]]: if not redis_client.hexists(f"item_id:{item_id}", "item_id"): raise HTTPException(status_code=404, detail="Item not found.") else: return {"item": redis_client.hgetall(f"item_id:{item_id}")} @app.get("/items") def list_items() -> dict[str, list[ItemPayload]]: items: list[ItemPayload] = [] stored_items: dict[str, str] = redis_client.hgetall("item_name_to_id") for name, id_str in stored_items.items(): item_id: int = int(id_str) item_name_str: str | None = redis_client.hget(f"item_id:{item_id}", "item_name") if item_name_str is not None: item_name: str = item_name_str else: continue # skip this item if it has no name item_quantity_str: str | None = redis_client.hget( f"item_id:{item_id}", "quantity" ) if item_quantity_str is not None: item_quantity: int = int(item_quantity_str) else: item_quantity = 0 items.append( ItemPayload(item_id=item_id, item_name=item_name, quantity=item_quantity) ) return {"items": items} # Route to delete a specific item by ID but using Redis @app.delete("/items/{item_id}") def delete_item(item_id: int) -> dict[str, str]: if not redis_client.hexists(f"item_id:{item_id}", "item_id"): raise HTTPException(status_code=404, detail="Item not found.") else: item_name: str | None = redis_client.hget(f"item_id:{item_id}", "item_name") redis_client.hdel("item_name_to_id", f"{item_name}") redis_client.delete(f"item_id:{item_id}") return {"result": "Item deleted."} # Route to remove some quantity of a specific item by ID but using Redis @app.delete("/items/{item_id}/{quantity}") def remove_quantity(item_id: int, quantity: int) -> dict[str, str]: if not redis_client.hexists(f"item_id:{item_id}", "item_id"): raise HTTPException(status_code=404, detail="Item not found.") item_quantity: str | None = redis_client.hget(f"item_id:{item_id}", "quantity") # if quantity to be removed is higher or equal to item's quantity, delete the item if item_quantity is None: existing_quantity: int = 0 else: existing_quantity: int = int(item_quantity) if existing_quantity <= quantity: item_name: str | None = redis_client.hget(f"item_id:{item_id}", "item_name") redis_client.hdel("item_name_to_id", f"{item_name}") redis_client.delete(f"item_id:{item_id}") return {"result": "Item deleted."} else: redis_client.hincrby(f"item_id:{item_id}", "quantity", -quantity) return {"result": f"{quantity} items removed."} -
重新运行调试器,通过与
/docs路由进行交互来测试此应用程序。完成后,您可以停止调试器。
恭喜!您现在拥有一个可运行的 FastAPI 应用程序,其中包含用于从杂货清单添加、列出和删除项目的路由,并且数据已持久化到 Redis 数据库中。
可选:设置数据库删除
现在数据已由 Redis 持久化,您可能希望创建一个脚本来删除所有测试数据。要做到这一点,请创建一个名为 flushdb.py 的新文件,其中包含以下内容。
import redis

redis_client = redis.StrictRedis(host='0.0.0.0', port=6379, db=0, decode_responses=True)
redis_client.flushdb()
然后,当您想重置数据库时,可以在 VS Code 中打开 flushdb.py 文件,然后选择编辑器右上角的Run按钮,或者从命令面板运行 Python: Run Python File in Terminal 命令。
请注意,这应该谨慎进行,因为它将删除当前数据库中的所有键,如果在生产环境中执行,可能会导致数据丢失。
可选:创建 GPT Action
使用 GitHub Codespaces,您可以在使用 GPT Actions 进行测试时托管您的应用程序。GPT Actions 是使 ChatGPT 能够与现有 API 交互以增强其功能的工具,使其能够执行广泛的操作。您可以观看下面的直播录像,创建自己的 ChatGPT 杂货清单插件。
注意:所有个人 GitHub.com 帐户在免费版或专业版套餐中都包含每月免费使用 GitHub Codespaces 的配额。有关更多信息,请访问 有关 GitHub Codespaces 的计费。
后续步骤
感谢您跟随本教程!希望您学到了有关 FastAPI 以及如何在 VS Code 中使用它的新知识。
本教程的完整代码项目可在 GitHub 上找到:python-sample-vscode-fastapi-tutorial。
在 官方文档中了解有关 FastAPI 的更多信息。
要尝试在生产网站上运行此应用程序,请查看教程 使用 Docker 容器将 Python 应用程序部署到 Azure App Service。
您还可以查看以下其他 VS Code Python 文章。