使用 WebAssembly 进行扩展开发 - 第二部分
2024 年 6 月 7 日,作者:Dirk Bäumer
在上一篇关于使用 WebAssembly 进行扩展开发 的博文中,我们演示了如何使用组件模型将 WebAssembly 代码集成到您的 Visual Studio Code 扩展中。在这篇博文中,我们重点介绍另外两个独立的应用场景:(a)在 worker 中运行 WebAssembly 代码,以避免阻塞扩展宿主的主线程;以及(b)使用可编译为 WebAssembly 的语言创建一个 语言服务器。
要运行本博文中的示例,您需要以下工具:VS Code、Node.js、Rust 编译器工具链、wasm-tools 和 wit-bindgen。
在 worker 中执行 WebAssembly 代码
上一篇博文中的示例在 VS Code 扩展宿主主线程中运行 WebAssembly 代码。只要执行时间很短,这就可以。但是,耗时的操作应该在 worker 中执行,以确保扩展宿主主线程可供其他扩展使用。
VS Code 组件模型提供了一个元模型,通过允许我们在 worker 和扩展主线程两侧自动生成必要的粘合代码,从而使此过程更加容易。
以下代码片段显示了 worker 所需的代码。示例假定代码存储在名为 worker.ts 的文件中。
import { Connection, RAL } from '@vscode/wasm-component-model';
import { calculator } from './calculator';

async function main(): Promise<void> {
  const connection = await Connection.createWorker(calculator._);
  connection.listen();
}

main().catch(RAL().console.error);
该代码创建了一个连接以与扩展宿主主 worker 通信,并使用 wit2ts 工具生成的 calculator world 初始化连接。
在扩展端,我们同样加载 WebAssembly 模块并将其绑定到 calculator world。执行计算的相应调用需要等待,因为执行是异步在 worker 中发生的(例如,await api.calc(...))。
// The channel for printing the result.
const channel = vscode.window.createOutputChannel('Calculator');
context.subscriptions.push(channel);

// The channel for printing the log.
const log = vscode.window.createOutputChannel('Calculator - Log', { log: true });
context.subscriptions.push(log);

// The implementation of the log function that is called from WASM
const service: calculator.Imports.Promisified = {
  log: async (msg: string): Promise<void> => {
    // Wait 100ms to slow things down :-)
    await new Promise(resolve => setTimeout(resolve, 100));
    log.info(msg);
  }
};

// Load the WASM model
const filename = vscode.Uri.joinPath(
  context.extensionUri,
  'target',
  'wasm32-unknown-unknown',
  'debug',
  'calculator.wasm'
);
const bits = await vscode.workspace.fs.readFile(filename);
const module = await WebAssembly.compile(bits);

// Create the worker
const worker = new Worker(
  vscode.Uri.joinPath(context.extensionUri, './out/worker.js').fsPath
);
// Bind the world to the worker
const api = await calculator._.bind(service, module, worker);

vscode.commands.registerCommand(
  'vscode-samples.wasm-component-model-async.run',
  async () => {
    channel.show();
    channel.appendLine('Running calculator example');
    const add = Types.Operation.Add({ left: 1, right: 2 });
    channel.appendLine(`Add ${await api.calc(add)}`);
    const sub = Types.Operation.Sub({ left: 10, right: 8 });
    channel.appendLine(`Sub ${await api.calc(sub)}`);
    const mul = Types.Operation.Mul({ left: 3, right: 7 });
    channel.appendLine(`Mul ${await api.calc(mul)}`);
    const div = Types.Operation.Div({ left: 10, right: 2 });
    channel.appendLine(`Div ${await api.calc(div)}`);
  }
);
有几点需要注意
- 此示例中使用的 WIT 文件与上一篇博文中 计算器示例 中使用的 WIT 文件没有区别。
- 由于 WebAssembly 代码的执行发生在 worker 中,因此导入的服务(例如上面的
log函数)的实现可以返回Promise,但并非必须。 - WebAssembly 目前仅支持同步执行模型。因此,从 worker 执行 WebAssembly 代码到扩展宿主主线程调用导入服务的每一次调用都需要以下步骤:
- 向扩展宿主主线程发送一条消息,描述要调用的服务(例如,调用
log函数)。 - 使用
Atomics.wait挂起 worker 执行。 - 在扩展宿主主线程中处理消息。
- 使用
Atomics.notify恢复 worker 并通知其结果。
- 向扩展宿主主线程发送一条消息,描述要调用的服务(例如,调用
此同步会增加可衡量的开销。尽管所有这些步骤都由组件模型透明地处理,但开发人员应意识到它们,并在设计导入的 API 表面时予以考虑。
您可以在 VS Code 扩展示例存储库 中找到此示例的完整源代码。
基于 WebAssembly 的语言服务器
当我们开始着手 为 VS Code for the Web 添加 WebAssembly 支持 时,我们设想的应用场景之一就是使用 WebAssembly 执行语言服务器。随着 VS Code 的 LSP 库 的最新更改以及一个用于桥接 WebAssembly 和 LSP 的新模块的引入,现在实现 WebAssembly 语言服务器就像将其实现为操作系统进程一样简单。
此外,WebAssembly 语言服务器运行在 WebAssembly Core Extension 上,该扩展完全支持 WASI Preview 1。这意味着语言服务器可以使用其编程语言的常规文件系统 API 访问工作区中的文件,即使这些文件存储在远程位置,例如 GitHub 存储库。
以下代码片段展示了一个基于 lsp_server crate 中 示例服务器 的 Rust 语言服务器。此语言服务器不执行任何语言分析,而只是为 GotoDefinition 请求返回预定义的结果。
match cast::<GotoDefinition>(req) {
    Ok((id, params)) => {
        let uri = params.text_document_position_params.text_document.uri;
        eprintln!("Received gotoDefinition request #{} {}", id, uri.to_string());
        let loc = Location::new(
            uri,
            lsp_types::Range::new(lsp_types::Position::new(0, 0), lsp_types::Position::new(0, 0))
        );
        let mut vec = Vec::new();
        vec.push(loc);
        let result = Some(GotoDefinitionResponse::Array(vec));
        let result = serde_json::to_value(&result).unwrap();
        let resp = Response { id, result: Some(result), error: None };
        connection.sender.send(Message::Response(resp))?;
        continue;
    }
    Err(err @ ExtractError::JsonError { .. }) => panic!("{err:?}"),
    Err(ExtractError::MethodMismatch(req)) => req,
};
您可以在 VS Code 示例存储库 中找到此语言服务器的完整源代码。
您可以使用新的 @vscode/wasm-wasi-lsp npm 模块在扩展的 TypeScript 代码中创建 WebAssembly 语言服务器。通过使用 WebAssembly Core Extension 将 WebAssembly 代码实例化为支持 WASI 的 worker,该扩展在我们的 在 VS Code for the Web 中运行 WebAssembly 博文中有详细介绍。
扩展的 TypeScript 代码也很简单。它为纯文本文件注册了服务器。
import {
  createStdioOptions,
  createUriConverters,
  startServer
} from '@vscode/wasm-wasi-lsp';

export async function activate(context: ExtensionContext) {
  const wasm: Wasm = await Wasm.load();

  const channel = window.createOutputChannel('LSP WASM Server');
  // The server options to run the WebAssembly language server.
  const serverOptions: ServerOptions = async () => {
    const options: ProcessOptions = {
      stdio: createStdioOptions(),
      mountPoints: [{ kind: 'workspaceFolder' }]
    };

    // Load the WebAssembly code
    const filename = Uri.joinPath(
      context.extensionUri,
      'server',
      'target',
      'wasm32-wasip1-threads',
      'release',
      'server.wasm'
    );
    const bits = await workspace.fs.readFile(filename);
    const module = await WebAssembly.compile(bits);

    // Create the wasm worker that runs the LSP server
    const process = await wasm.createProcess(
      'lsp-server',
      module,
      { initial: 160, maximum: 160, shared: true },
      options
    );

    // Hook stderr to the output channel
    const decoder = new TextDecoder('utf-8');
    process.stderr!.onData(data => {
      channel.append(decoder.decode(data));
    });

    return startServer(process);
  };

  const clientOptions: LanguageClientOptions = {
    documentSelector: [{ language: 'plaintext' }],
    outputChannel: channel,
    uriConverters: createUriConverters()
  };

  let client = new LanguageClient('lspClient', 'LSP Client', serverOptions, clientOptions);
  await client.start();
}
运行代码会在纯文本文件的上下文菜单中添加一个 Goto Definition 条目。执行此操作会将相应的请求发送到 LSP 服务器。
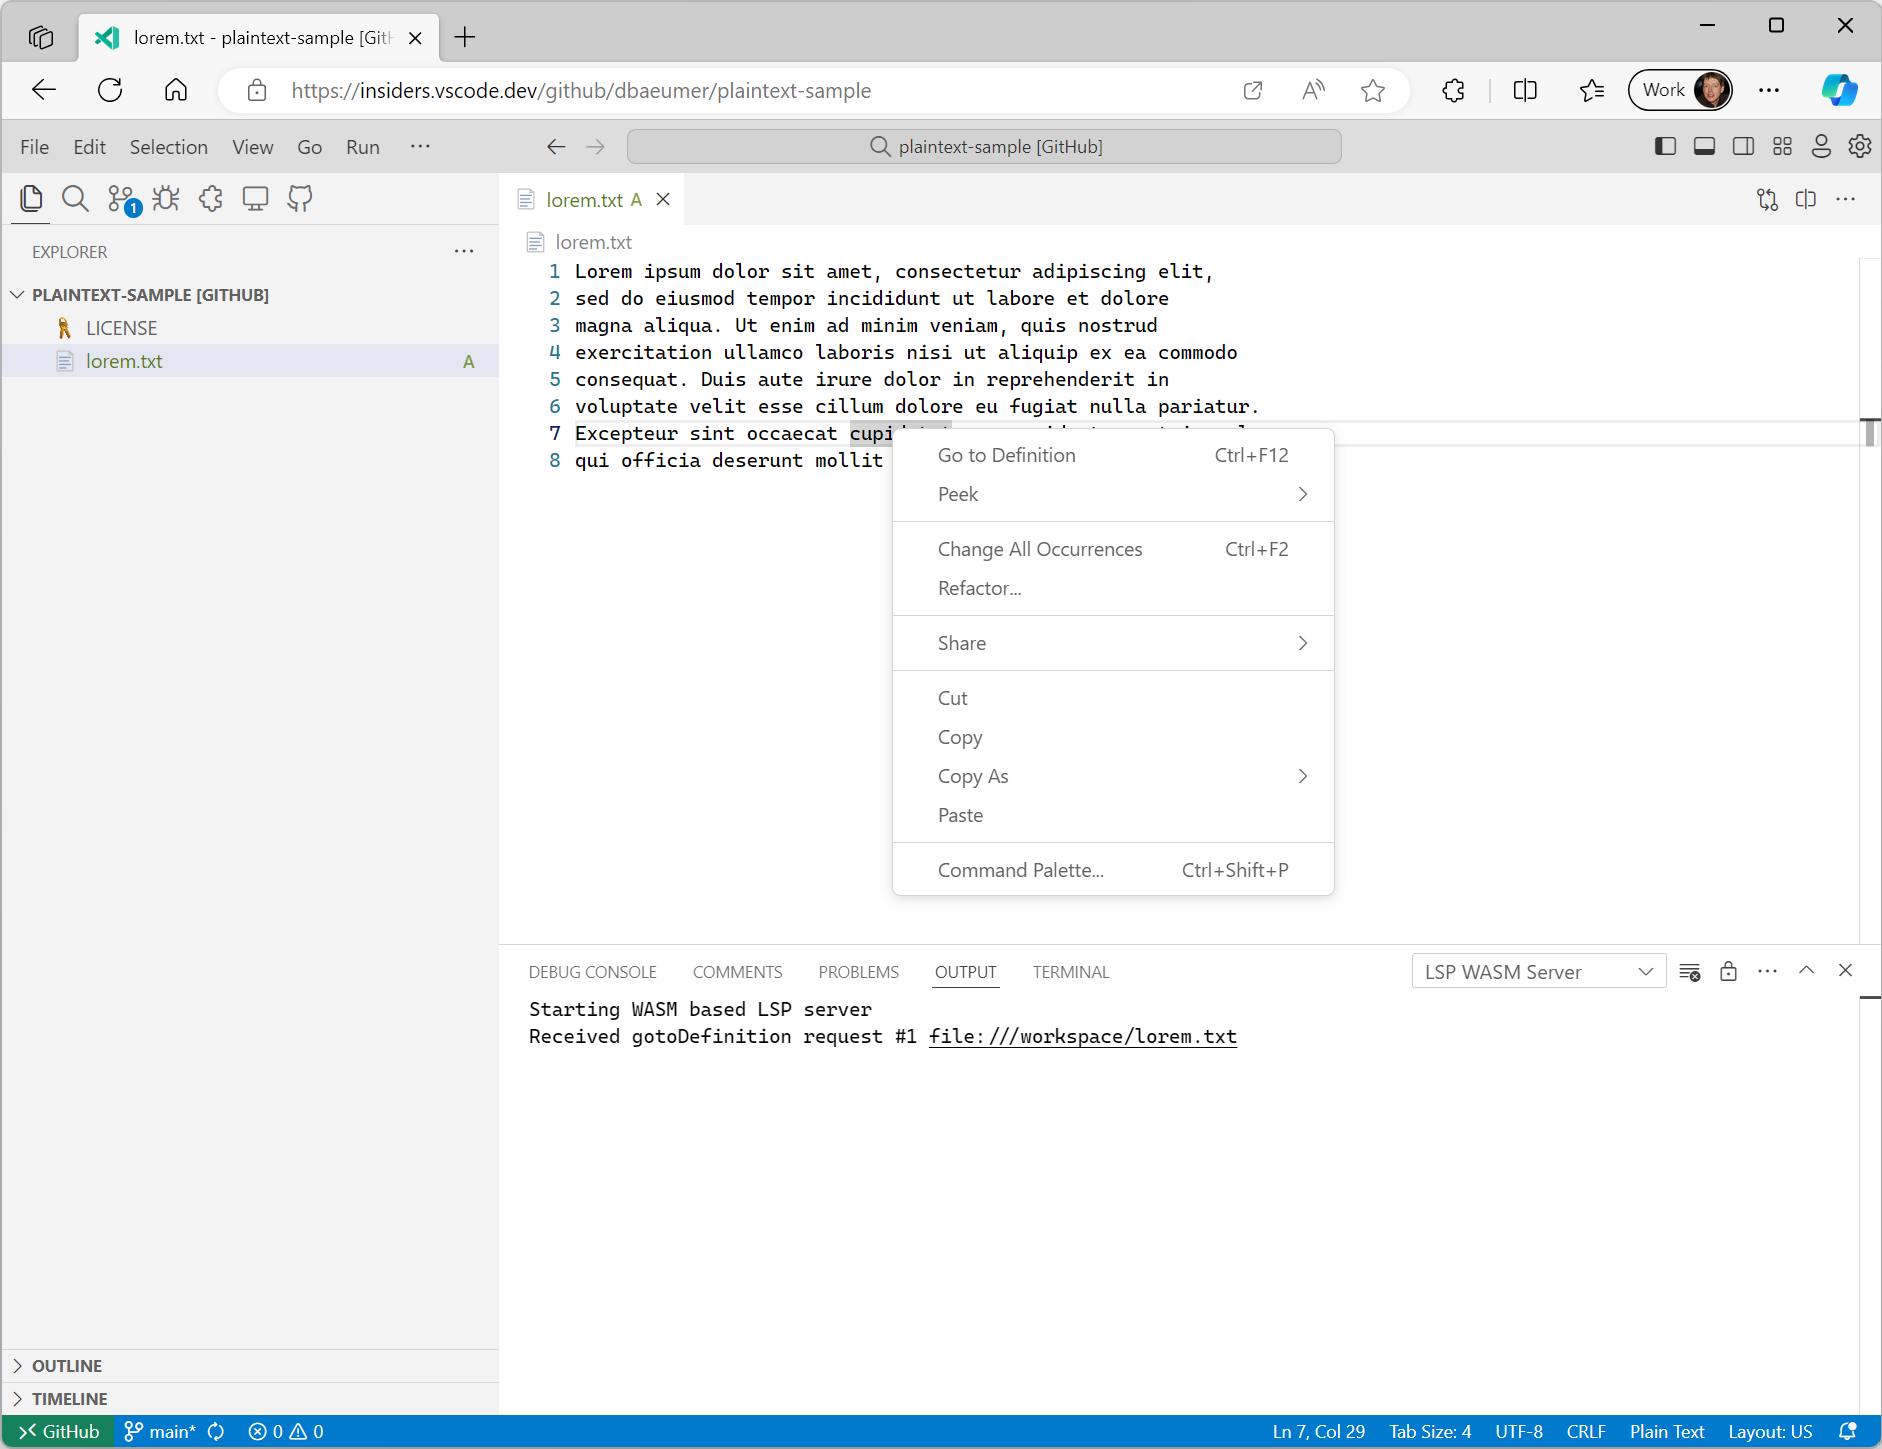
需要注意的是,@vscode/wasm-wasi-lsp npm 模块会自动将文档 URI 从其工作区值转换为 WASI Preview 1 主机中识别的值。在上面的示例中,VS Code 内的文本文档 URI 通常类似于 vscode-vfs://github/dbaeumer/plaintext-sample/lorem.txt,此值会被转换为 file:///workspace/lorem.txt,这是 WASI 主机内识别的值。当语言服务器将 URI 发回 VS Code 时,此转换也会自动发生。
大多数语言服务器库都支持自定义消息,这使得向语言服务器添加 Language Server Protocol Specification 中尚不存在的功能变得容易。以下代码片段展示了如何为我们之前使用的 Rust 语言服务器添加一个自定义消息处理程序,用于计算给定工作区文件夹中的文件数量。
#[derive(Debug, Eq, PartialEq, Clone, Deserialize, Serialize)]
#[serde(rename_all = "camelCase")]
pub struct CountFilesParams {
pub folder: Url,
}
pub enum CountFilesRequest {}
impl Request for CountFilesRequest {
type Params = CountFilesParams;
type Result = u32;
const METHOD: &'static str = "wasm-language-server/countFilesInDirectory";
}
//...
for msg in &connection.receiver {
match msg {
//....
match cast::<CountFilesRequest>(req) {
Ok((id, params)) => {
eprintln!("Received countFiles request #{} {}", id, params.folder);
let result = count_files_in_directory(¶ms.folder.path());
let json = serde_json::to_value(&result).unwrap();
let resp = Response { id, result: Some(json), error: None };
connection.sender.send(Message::Response(resp))?;
continue;
}
Err(err @ ExtractError::JsonError { .. }) => panic!("{err:?}"),
Err(ExtractError::MethodMismatch(req)) => req,
}
}
//...
}
fn count_files_in_directory(path: &str) -> usize {
WalkDir::new(path)
.into_iter()
.filter_map(Result::ok)
.filter(|entry| entry.file_type().is_file())
.count()
}
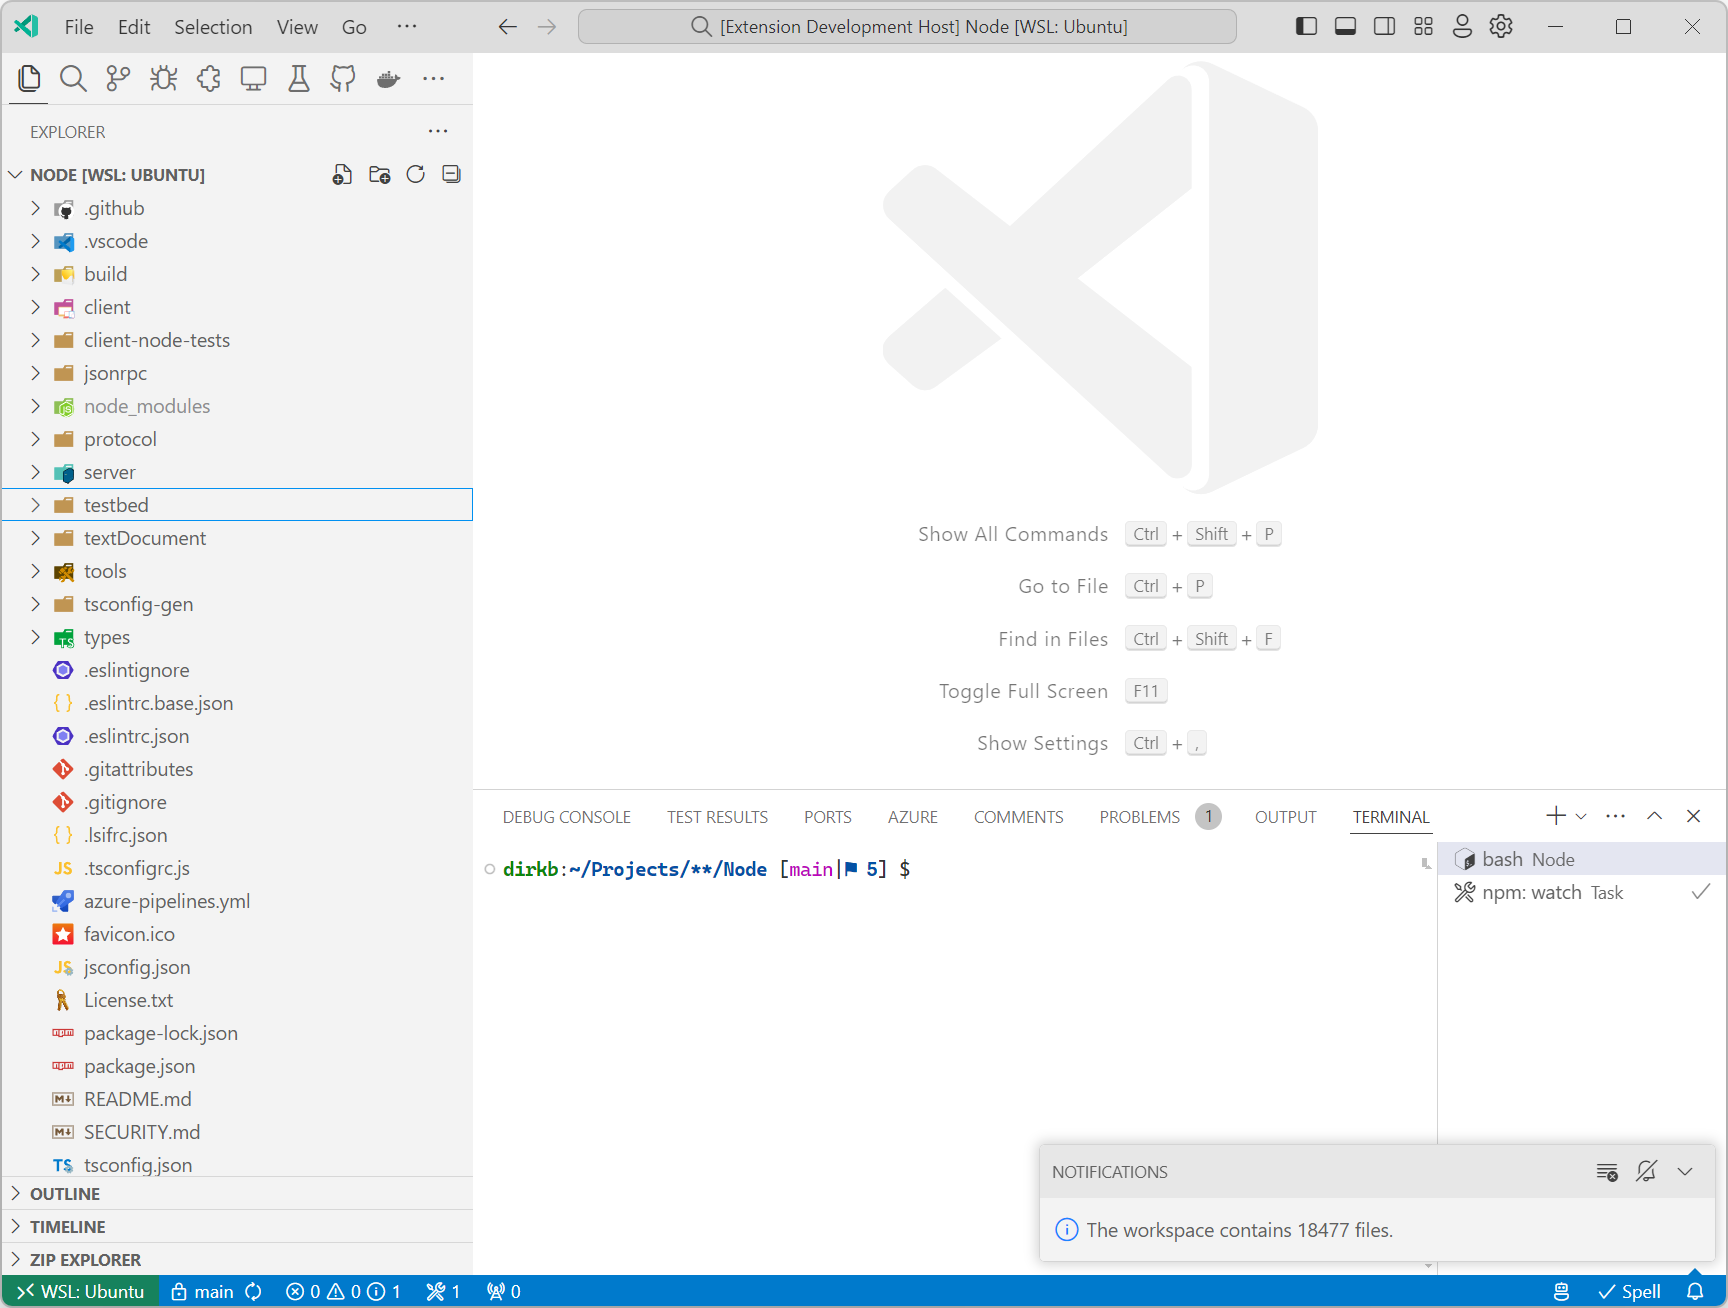
用于将此自定义请求发送到 LSP 服务器的 TypeScript 代码如下所示:
const folder = workspace.workspaceFolders![0].uri;
const result = await client.sendRequest(CountFilesRequest, {
  folder: client.code2ProtocolConverter.asUri(folder)
});
window.showInformationMessage(`The workspace contains ${result} files.`);
在 vscode-languageserver 存储库上运行此代码会显示以下通知:
请注意,语言服务器不一定需要实现 Language Server Protocol 规范中指定的任何功能。如果扩展希望集成只能编译为 WASI Preview 1 目标库的代码,那么在 VS Code 的组件模型实现支持 WASI 0.2 preview 之前,实现一个带有自定义消息的语言服务器可能是一个不错的选择。
下一步
正如上一篇博文中所述,我们将继续努力为 VS Code 实现 WASI 0.2 preview。我们还计划扩展代码示例,使其包含除 Rust 之外的其他编译到 WASM 的语言。
谢谢,
Dirk 和 VS Code 团队
编码愉快!