Webview API
Webview API 允许扩展在 Visual Studio Code 中创建完全可自定义的视图。例如,内置的 Markdown 扩展使用 webview 来渲染 Markdown 预览。Webview 还可以用于构建超出 VS Code 原生 API 支持范围的复杂用户界面。
将 webview 视为 VS Code 中的一个 iframe,由您的扩展控制。Webview 可以在此框架中渲染几乎任何 HTML 内容,并使用消息传递与扩展进行通信。这种自由使得 webview 极其强大,并开启了全新的扩展可能性。
Webview 在多个 VS Code API 中使用
- 使用
createWebviewPanel创建的 Webview 面板。在这种情况下,Webview 面板在 VS Code 中显示为独立的编辑器。这使得它们对于显示自定义 UI 和自定义可视化非常有用。 - 作为 自定义编辑器 的视图。自定义编辑器允许扩展提供自定义 UI 来编辑工作区中的任何文件。自定义编辑器 API 还允许您的扩展挂钩到编辑器事件,如撤销和重做,以及文件事件,如保存。
- 在显示在侧边栏或面板区域的 Webview 视图 中。有关更多详细信息,请参阅 webview 视图示例扩展。
本页重点介绍基本的 webview 面板 API,尽管这里涵盖的内容几乎都适用于自定义编辑器和 webview 视图中使用的 webview。即使您对那些 API 更感兴趣,我们也建议先阅读本页以熟悉 webview 的基础知识。
链接
VS Code API 用法
我应该使用 webview 吗?
Webview 非常强大,但应该谨慎使用,并且仅在 VS Code 的原生 API 不足时使用。Webview 资源消耗大,并且运行在与普通扩展不同的上下文中。设计不佳的 webview 也容易在 VS Code 中显得格格不入。
在使用 webview 之前,请考虑以下几点
-
这个功能真的需要存在于 VS Code 中吗?是否作为一个独立的应用程序或网站更好?
-
webview 是实现功能的唯一方法吗?您可以使用常规的 VS Code API 代替吗?
-
您的 webview 是否能提供足够的用户价值,以证明其高资源消耗是合理的?
请记住:仅仅因为您可以使用 webview 做某事,并不意味着您应该这样做。但是,如果您确信需要使用 webview,那么本文档将为您提供帮助。让我们开始吧。
Webview API 基础知识
为了解释 webview API,我们将构建一个名为“Cat Coding”的简单扩展。此扩展将使用 webview 显示一只正在编写代码(大概是在 VS Code 中)的猫的 gif。随着我们对 API 的深入了解,我们将继续为该扩展添加功能,包括一个计数器,用于跟踪我们的猫已编写的源代码行数,以及在猫引入 bug 时通知用户的通知。
这是 Cat Coding 扩展第一个版本的 package.json。您可以在此处找到示例应用的完整代码。我们扩展的第一个版本贡献了一个命令,名为 catCoding.start。当用户调用此命令时,我们将显示一个带有我们猫的简单 webview。用户可以从命令面板中将此命令作为Cat Coding: Start new cat coding session调用,甚至可以为其创建快捷键绑定。
{
  "name": "cat-coding",
  "description": "Cat Coding",
  "version": "0.0.1",
  "publisher": "bierner",
  "engines": {
    "vscode": "^1.74.0"
  },
  "activationEvents": [],
  "main": "./out/extension.js",
  "contributes": {
    "commands": [
      {
        "command": "catCoding.start",
        "title": "Start new cat coding session",
        "category": "Cat Coding"
      }
    ]
  },
  "scripts": {
    "vscode:prepublish": "tsc -p ./",
    "compile": "tsc -watch -p ./",
    "postinstall": "node ./node_modules/vscode/bin/install"
  },
  "dependencies": {
    "vscode": "*"
  },
  "devDependencies": {
    "@types/node": "^9.4.6",
    "typescript": "^2.8.3"
  }
}
注意:如果您的扩展针对的是 1.74 之前的 VS Code 版本,则必须在
activationEvents中显式列出onCommand:catCoding.start。
现在让我们实现 catCoding.start 命令。在我们的扩展主文件中,我们注册 catCoding.start 命令并使用它来显示一个基本的 webview
import * as vscode from 'vscode';

export function activate(context: vscode.ExtensionContext) {
  context.subscriptions.push(
    vscode.commands.registerCommand('catCoding.start', () => {
      // Create and show a new webview
      const panel = vscode.window.createWebviewPanel(
        'catCoding', // Identifies the type of the webview. Used internally
        'Cat Coding', // Title of the panel displayed to the user
        vscode.ViewColumn.One, // Editor column to show the new webview panel in.
        {} // Webview options. More on these later.
      );
    })
  );
}
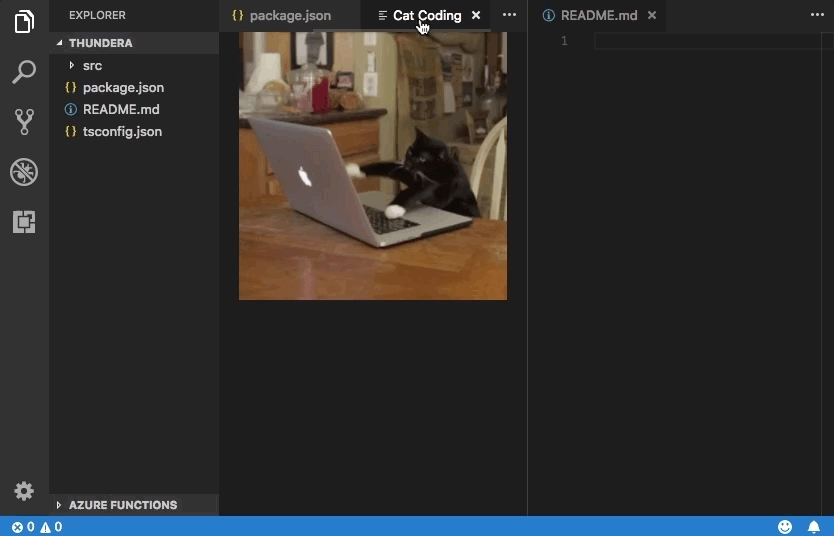
vscode.window.createWebviewPanel 函数会在编辑器中创建并显示一个 webview。如果您尝试运行当前状态下的 catCoding.start 命令,您将看到以下内容
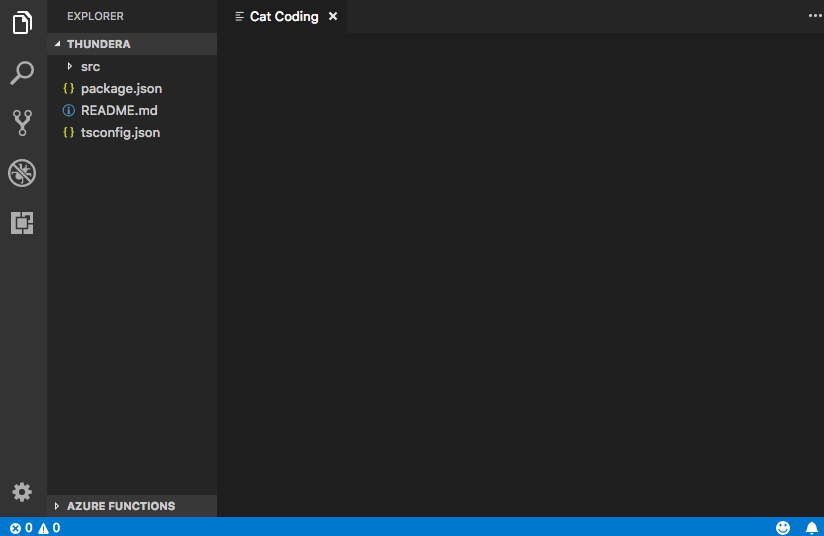
我们的命令会打开一个具有正确标题的新 webview 面板,但没有内容!要将我们的猫添加到新面板,我们还需要使用 webview.html 设置 webview 的 HTML 内容
import * as vscode from 'vscode';

export function activate(context: vscode.ExtensionContext) {
  context.subscriptions.push(
    vscode.commands.registerCommand('catCoding.start', () => {
      // Create and show panel
      const panel = vscode.window.createWebviewPanel(
        'catCoding',
        'Cat Coding',
        vscode.ViewColumn.One,
        {}
      );

      // And set its HTML content
      panel.webview.html = getWebviewContent();
    })
  );
}

function getWebviewContent() {
  return `<!DOCTYPE html>
<html lang="en">
<head>
    <meta charset="UTF-8">
    <meta name="viewport" content="width=device-width, initial-scale=1.0">
    <title>Cat Coding</title>
</head>
<body>
    <img src="https://media.giphy.com/media/JIX9t2j0ZTN9S/giphy.gif" width="300" />
</body>
</html>`;
}
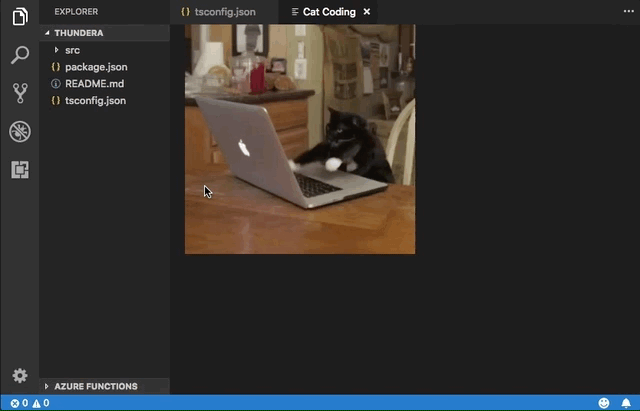
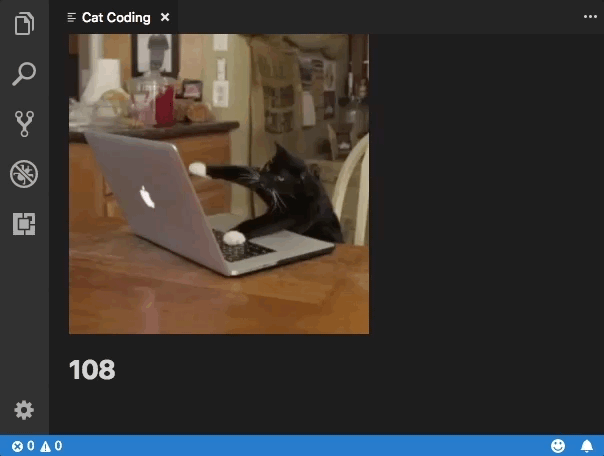
如果您再次运行命令,现在 webview 看起来是这样的
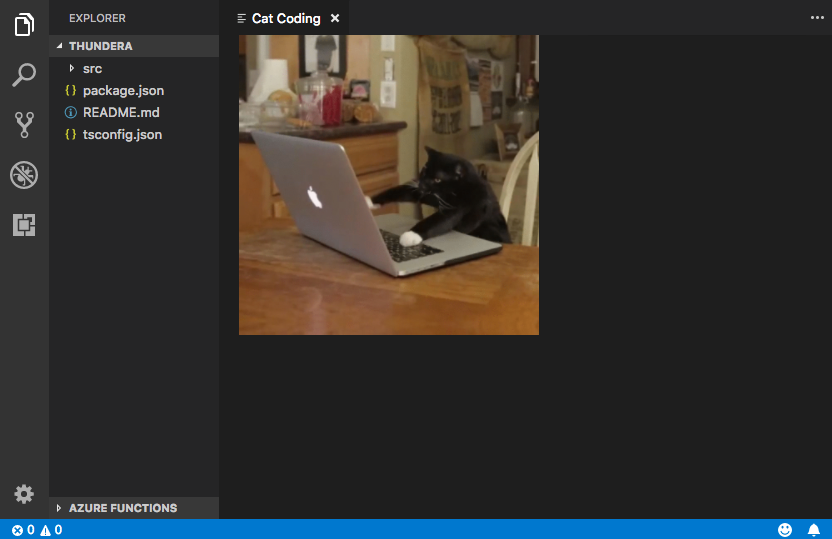
进展不错!
webview.html 应始终是一个完整的 HTML 文档。HTML 片段或格式错误的 HTML 可能会导致意外行为。
更新 webview 内容
webview.html 也可以在创建后更新 webview 的内容。让我们通过引入猫的轮换来使用此功能,使 Cat Coding 更加动态
import * as vscode from 'vscode';

const cats = {
  'Coding Cat': 'https://media.giphy.com/media/JIX9t2j0ZTN9S/giphy.gif',
  'Compiling Cat': 'https://media.giphy.com/media/mlvseq9yvZhba/giphy.gif'
};

export function activate(context: vscode.ExtensionContext) {
  context.subscriptions.push(
    vscode.commands.registerCommand('catCoding.start', () => {
      const panel = vscode.window.createWebviewPanel(
        'catCoding',
        'Cat Coding',
        vscode.ViewColumn.One,
        {}
      );

      let iteration = 0;
      const updateWebview = () => {
        const cat = iteration++ % 2 ? 'Compiling Cat' : 'Coding Cat';
        panel.title = cat;
        panel.webview.html = getWebviewContent(cat);
      };

      // Set initial content
      updateWebview();

      // And schedule updates to the content every second
      setInterval(updateWebview, 1000);
    })
  );
}

function getWebviewContent(cat: keyof typeof cats) {
  return `<!DOCTYPE html>
<html lang="en">
<head>
    <meta charset="UTF-8">
    <meta name="viewport" content="width=device-width, initial-scale=1.0">
    <title>Cat Coding</title>
</head>
<body>
    <img src="${cats[cat]}" width="300" />
</body>
</html>`;
}
设置 webview.html 会替换整个 webview 内容,类似于重新加载 iframe。在开始在 webview 中使用脚本时,这一点很重要,因为它意味着设置 webview.html 也会重置脚本的状态。
上面的示例还使用 webview.title 来更改编辑器中显示的文档标题。设置标题不会导致 webview 被重新加载。
生命周期
Webview 面板由创建它们的扩展拥有。扩展必须保留 createWebviewPanel 返回的 webview。如果您的扩展丢失了此引用,即使 webview 仍在 VS Code 中显示,它也无法再次访问该 webview。
与文本编辑器一样,用户也可以随时关闭 webview 面板。当用户关闭 webview 面板时,webview 本身将被销毁。尝试使用已销毁的 webview 会引发异常。这意味着上面使用 setInterval 的示例实际上存在一个重要错误:如果用户关闭面板,setInterval 将继续触发,它将尝试更新 panel.webview.html,这当然会引发异常。猫讨厌异常。让我们来修复它!
当 webview 被销毁时,会触发 onDidDispose 事件。我们可以使用此事件来取消进一步的更新并清理 webview 的资源
import * as vscode from 'vscode';

const cats = {
  'Coding Cat': 'https://media.giphy.com/media/JIX9t2j0ZTN9S/giphy.gif',
  'Compiling Cat': 'https://media.giphy.com/media/mlvseq9yvZhba/giphy.gif'
};

export function activate(context: vscode.ExtensionContext) {
  context.subscriptions.push(
    vscode.commands.registerCommand('catCoding.start', () => {
      const panel = vscode.window.createWebviewPanel(
        'catCoding',
        'Cat Coding',
        vscode.ViewColumn.One,
        {}
      );

      let iteration = 0;
      const updateWebview = () => {
        const cat = iteration++ % 2 ? 'Compiling Cat' : 'Coding Cat';
        panel.title = cat;
        panel.webview.html = getWebviewContent(cat);
      };

      updateWebview();
      const interval = setInterval(updateWebview, 1000);

      panel.onDidDispose(
        () => {
          // When the panel is closed, cancel any future updates to the webview content
          clearInterval(interval);
        },
        null,
        context.subscriptions
      );
    })
  );
}
扩展还可以通过调用 webview 上的 dispose() 来以编程方式关闭 webview。例如,如果我们想将猫的工作时间限制为五秒
export function activate(context: vscode.ExtensionContext) {
  context.subscriptions.push(
    vscode.commands.registerCommand('catCoding.start', () => {
      const panel = vscode.window.createWebviewPanel(
        'catCoding',
        'Cat Coding',
        vscode.ViewColumn.One,
        {}
      );

      panel.webview.html = getWebviewContent('Coding Cat');

      // After 5sec, programmatically close the webview panel
      const timeout = setTimeout(() => panel.dispose(), 5000);

      panel.onDidDispose(
        () => {
          // Handle user closing panel before the 5sec have passed
          clearTimeout(timeout);
        },
        null,
        context.subscriptions
      );
    })
  );
}
可见性和移动
当 webview 面板移到后台标签页时,它会变得隐藏。但它不会被销毁。当面板再次恢复到前台时,VS Code 将自动从 webview.html 恢复 webview 的内容
.visible 属性告诉您 webview 面板当前是否可见。
扩展可以通过调用 reveal() 以编程方式将 webview 面板带到前台。此方法接受一个可选的目标视图列来显示面板。一个 webview 面板一次只能显示在一个编辑器列中。调用 reveal() 或将 webview 面板拖到新的编辑器列会将 webview 移到该新列中。
让我们更新我们的扩展,使其一次只允许存在一个 webview。如果面板在后台,则 catCoding.start 命令会将其带到前台
export function activate(context: vscode.ExtensionContext) {
  // Track the current panel with a webview
  let currentPanel: vscode.WebviewPanel | undefined = undefined;

  context.subscriptions.push(
    vscode.commands.registerCommand('catCoding.start', () => {
      const columnToShowIn = vscode.window.activeTextEditor
        ? vscode.window.activeTextEditor.viewColumn
        : undefined;

      if (currentPanel) {
        // If we already have a panel, show it in the target column
        currentPanel.reveal(columnToShowIn);
      } else {
        // Otherwise, create a new panel
        currentPanel = vscode.window.createWebviewPanel(
          'catCoding',
          'Cat Coding',
          columnToShowIn || vscode.ViewColumn.One,
          {}
        );
        currentPanel.webview.html = getWebviewContent('Coding Cat');

        // Reset when the current panel is closed
        currentPanel.onDidDispose(
          () => {
            currentPanel = undefined;
          },
          null,
          context.subscriptions
        );
      }
    })
  );
}
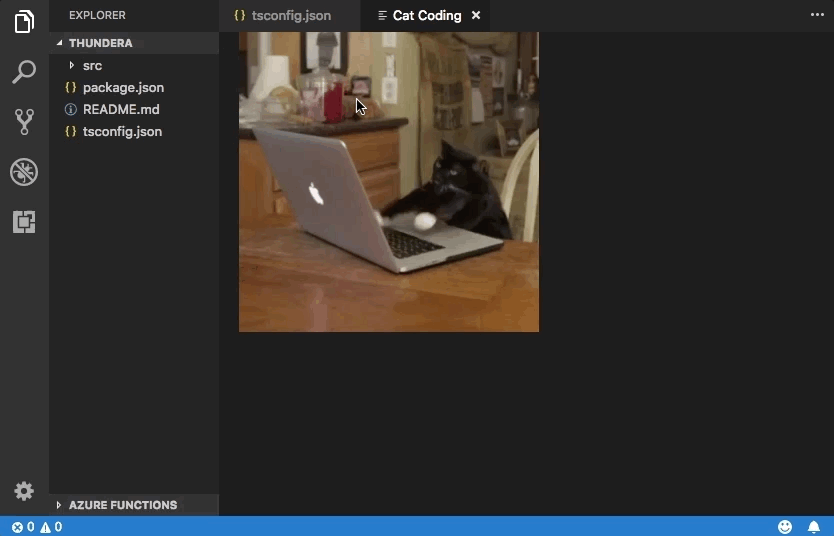
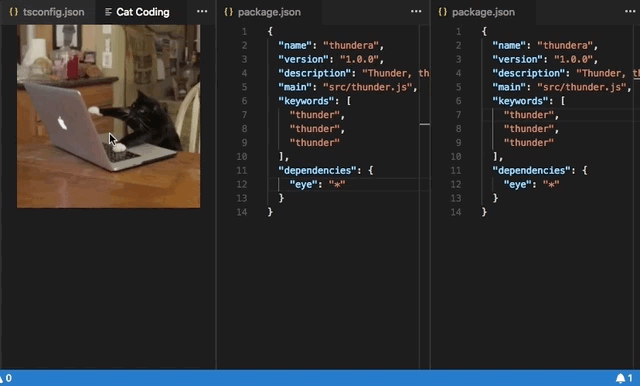
这是新扩展在实际使用中的效果
每当 webview 的可见性发生变化,或者当 webview 被移到新列时,都会触发 onDidChangeViewState 事件。我们的扩展可以使用此事件根据 webview 显示的列来更改猫。
const cats = {
  'Coding Cat': 'https://media.giphy.com/media/JIX9t2j0ZTN9S/giphy.gif',
  'Compiling Cat': 'https://media.giphy.com/media/mlvseq9yvZhba/giphy.gif',
  'Testing Cat': 'https://media.giphy.com/media/3oriO0OEd9QIDdllqo/giphy.gif'
};

export function activate(context: vscode.ExtensionContext) {
  context.subscriptions.push(
    vscode.commands.registerCommand('catCoding.start', () => {
      const panel = vscode.window.createWebviewPanel(
        'catCoding',
        'Cat Coding',
        vscode.ViewColumn.One,
        {}
      );
      panel.webview.html = getWebviewContent('Coding Cat');

      // Update contents based on view state changes
      panel.onDidChangeViewState(
        e => {
          const panel = e.webviewPanel;
          switch (panel.viewColumn) {
            case vscode.ViewColumn.One:
              updateWebviewForCat(panel, 'Coding Cat');
              return;

            case vscode.ViewColumn.Two:
              updateWebviewForCat(panel, 'Compiling Cat');
              return;

            case vscode.ViewColumn.Three:
              updateWebviewForCat(panel, 'Testing Cat');
              return;
          }
        },
        null,
        context.subscriptions
      );
    })
  );
}

function updateWebviewForCat(panel: vscode.WebviewPanel, catName: keyof typeof cats) {
  panel.title = catName;
  panel.webview.html = getWebviewContent(catName);
}
检查和调试 webview
Developer: Toggle Developer Tools 命令会打开一个 开发者工具窗口,您可以使用它来调试和检查您的 webview。

请注意,如果您使用的是早于 1.56 版本的 VS Code,或者您正在尝试调试一个设置了 enableFindWidget 的 webview,则必须改用 Developer: Open Webview Developer Tools 命令。此命令会为每个 webview 打开一个专用的开发者工具页面,而不是使用一个由所有 webview 和编辑器本身共享的开发者工具页面。
从开发者工具中,您可以使用位于开发者工具窗口左上角的检查工具开始检查 webview 的内容
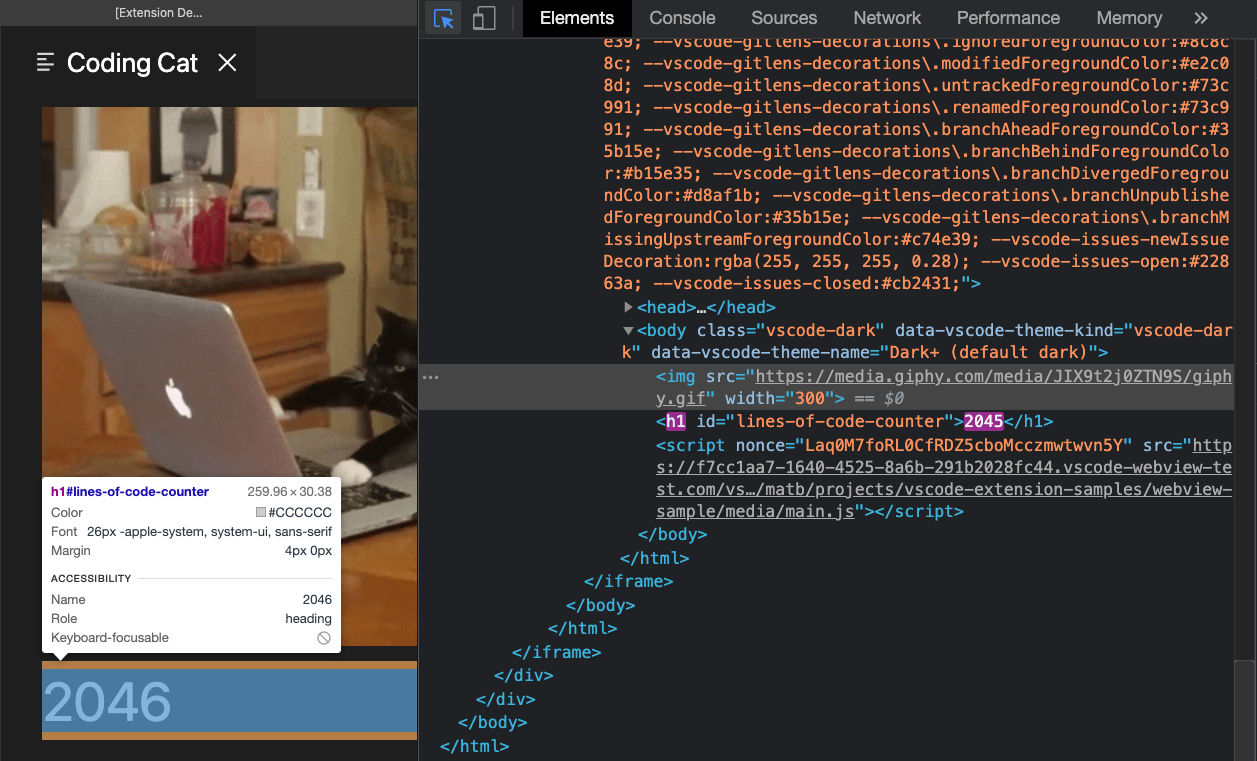
您还可以查看开发者工具控制台中的 webview 的所有错误和日志
要在 webview 的上下文中评估表达式,请确保从开发者工具控制台面板左上角的下拉菜单中选择活动帧环境
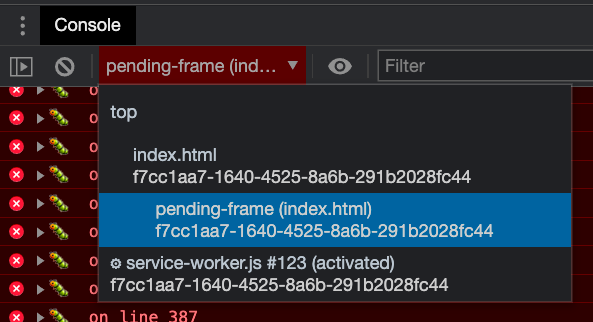
活动帧环境是 webview 脚本本身执行的地方。
此外,Developer: Reload Webview 命令会重新加载所有活动的 webview。如果您需要重置 webview 的状态,或者磁盘上的一些 webview 内容已更改并希望加载新内容,这会很有帮助。
加载本地内容
Webview 在隔离的上下文中运行,无法直接访问本地资源。这是出于安全原因。这意味着,为了加载扩展中的图像、样式表和其他资源,或加载用户当前工作区中的任何内容,您必须使用 Webview.asWebviewUri 函数将本地 file: URI 转换为 VS Code 可以用来加载部分本地资源的特殊 URI。
设想一下,我们想将猫的 gif 图打包到我们的扩展中,而不是从 Giphy 获取。为此,我们首先创建一个指向磁盘上文件的 URI,然后将这些 URI 通过 asWebviewUri 函数传递
import * as vscode from 'vscode';

export function activate(context: vscode.ExtensionContext) {
  context.subscriptions.push(
    vscode.commands.registerCommand('catCoding.start', () => {
      const panel = vscode.window.createWebviewPanel(
        'catCoding',
        'Cat Coding',
        vscode.ViewColumn.One,
        {}
      );

      // Get path to resource on disk
      const onDiskPath = vscode.Uri.joinPath(context.extensionUri, 'media', 'cat.gif');

      // And get the special URI to use with the webview
      const catGifSrc = panel.webview.asWebviewUri(onDiskPath);

      panel.webview.html = getWebviewContent(catGifSrc);
    })
  );
}

function getWebviewContent(catGifSrc: vscode.Uri) {
  return `<!DOCTYPE html>
<html lang="en">
<head>
    <meta charset="UTF-8">
    <meta name="viewport" content="width=device-width, initial-scale=1.0">
    <title>Cat Coding</title>
</head>
<body>
    <img src="${catGifSrc}" width="300" />
</body>
</html>`;
}
如果调试此代码,我们会看到 catGifSrc 的实际值类似于
vscode-resource:/Users/toonces/projects/vscode-cat-coding/media/cat.gif
VS Code 理解这个特殊的 URI,并将使用它从磁盘加载我们的 gif!
默认情况下,webview 只能访问以下位置的资源
- 在您的扩展安装目录内。
- 在用户当前活动的工作区内。
使用 WebviewOptions.localResourceRoots 允许访问其他本地资源。
您始终可以使用数据 URI 将资源直接嵌入到 webview 中。
控制对本地资源的访问
Webview 可以使用 localResourceRoots 选项控制可以从用户计算机加载哪些资源。localResourceRoots 定义了一组可以加载本地内容的根 URI。
我们可以使用 localResourceRoots 将 Cat Coding webview 限制为仅从我们扩展中的 media 目录加载资源
import * as vscode from 'vscode';

export function activate(context: vscode.ExtensionContext) {
  context.subscriptions.push(
    vscode.commands.registerCommand('catCoding.start', () => {
      const panel = vscode.window.createWebviewPanel(
        'catCoding',
        'Cat Coding',
        vscode.ViewColumn.One,
        {
          // Only allow the webview to access resources in our extension's media directory
          localResourceRoots: [vscode.Uri.joinPath(context.extensionUri, 'media')]
        }
      );

      const onDiskPath = vscode.Uri.joinPath(context.extensionUri, 'media', 'cat.gif');
      const catGifSrc = panel.webview.asWebviewUri(onDiskPath);

      panel.webview.html = getWebviewContent(catGifSrc);
    })
  );
}
要禁止所有本地资源,只需将 localResourceRoots 设置为 []。
总的来说,webview 在加载本地资源时应尽可能受限制。但是,请记住,localResourceRoots 本身并不提供完整的安全保护。确保您的 webview 还遵循 安全最佳实践,并添加 内容安全策略 以进一步限制可加载的内容。
主题化 webview 内容
Webview 可以使用 CSS 根据 VS Code 的当前主题更改其外观。VS Code 将主题分为三类,并在 body 元素中添加一个特殊类来指示当前主题
vscode-light- 浅色主题。vscode-dark- 深色主题。vscode-high-contrast- 高对比度主题。
以下 CSS 根据用户当前的主题更改 webview 的文本颜色
body.vscode-light {
  color: black;
}

body.vscode-dark {
  color: white;
}

body.vscode-high-contrast {
  color: red;
}
在开发 webview 应用程序时,请确保它适用于这三种主题。并且务必在高对比度模式下测试您的 webview,以确保视障人士能够使用它。
Webview 还可以使用 CSS 变量 访问 VS Code 主题颜色。这些变量名以 vscode 开头,并将 . 替换为 -。例如,editor.foreground 变为 var(--vscode-editor-foreground)
code {
  color: var(--vscode-editor-foreground);
}
有关可用主题变量,请参阅 主题颜色参考。有一个扩展提供了变量的 IntelliSense 建议。
以下字体相关变量也已定义
--vscode-editor-font-family- 编辑器字体系列(来自editor.fontFamily设置)。--vscode-editor-font-weight- 编辑器字体粗细(来自editor.fontWeight设置)。--vscode-editor-font-size- 编辑器字体大小(来自editor.fontSize设置)。
最后,对于需要编写针对单个主题的 CSS 的特殊情况,webview 的 body 元素有一个名为 vscode-theme-id 的数据属性,该属性存储当前活动主题的 ID。这允许您为 webview 编写特定于主题的 CSS
body[data-vscode-theme-id="One Dark Pro"] {
    background: hotpink;
}
支持的媒体格式
Webview 支持音频和视频,但并非所有媒体编解码器或媒体文件容器类型都受支持。
以下音频格式可在 Webview 中使用
- Wav
- Mp3
- Ogg
- Flac
以下视频格式可在 webview 中使用
- H.264
- VP8
对于视频文件,请确保视频和音频轨道都支持媒体格式。例如,许多 .mp4 文件使用 H.264 进行视频编码和 AAC 音频编码。VS Code 将能够播放 mp4 的视频部分,但由于不支持 AAC 音频,因此不会有声音。相反,您需要为音频轨道使用 mp3。
上下文菜单
高级 webview 可以自定义用户在 webview 中右键单击时显示的上下文菜单。这可以通过贡献点来实现,与 VS Code 的普通上下文菜单类似,因此自定义菜单能很好地融入编辑器的其余部分。Webview 还可以为 webview 的不同部分显示自定义上下文菜单。
要向您的 webview 添加新的上下文菜单项,请首先在 menus 下的新 webview/context 部分添加一个新条目。每个贡献都包含一个 command(其标题也来自此处)和一个 when 子句。when 子句应包含 webviewId == 'YOUR_WEBVIEW_VIEW_TYPE' 以确保上下文菜单仅适用于您扩展的 webview
"contributes": {
  "menus": {
    "webview/context": [
      {
        "command": "catCoding.yarn",
        "when": "webviewId == 'catCoding'"
      },
      {
        "command": "catCoding.insertLion",
        "when": "webviewId == 'catCoding' && webviewSection == 'editor'"
      }
    ]
  },
  "commands": [
    {
      "command": "catCoding.yarn",
      "title": "Yarn 🧶",
      "category": "Cat Coding"
    },
    {
      "command": "catCoding.insertLion",
      "title": "Insert 🦁",
      "category": "Cat Coding"
    },
    ...
  ]
}
在 webview 内部,您还可以使用 data-vscode-context 数据属性(或在 JavaScript 中使用 dataset.vscodeContext)设置 HTML 特定区域的上下文。data-vscode-context 值是一个 JSON 对象,它指定当用户右键单击元素时要设置的上下文。最终上下文是从文档根到单击的元素确定的。
例如,考虑以下 HTML
<div class="main" data-vscode-context='{"webviewSection": "main", "mouseCount": 4}'>
  <h1>Cat Coding</h1>

  <textarea data-vscode-context='{"webviewSection": "editor", "preventDefaultContextMenuItems": true}'></textarea>
</div>
如果用户右键单击 textarea,将设置以下上下文
webviewSection == 'editor'- 此项覆盖父元素的webviewSection。mouseCount == 4- 此项继承自父元素。preventDefaultContextMenuItems == true- 这是一个特殊上下文,可隐藏 VS Code 通常添加到 webview 上下文菜单的复制和粘贴条目。
如果用户在 <textarea> 内右键单击,他们将看到
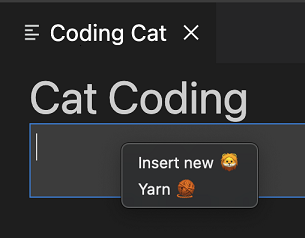
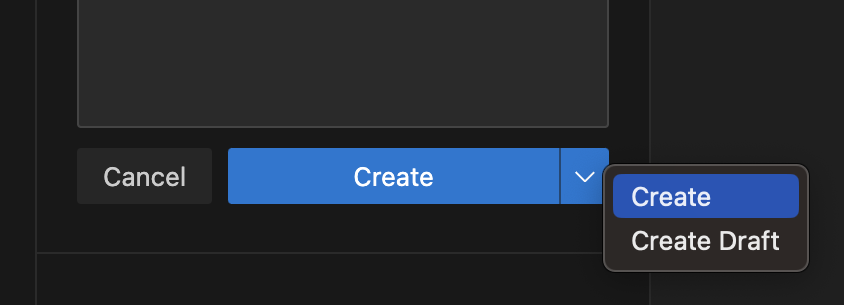
有时在左键/主键单击时显示菜单很有用。例如,要显示一个拆分按钮上的菜单。您可以通过在 onClick 事件中调度 contextmenu 事件来执行此操作
<button data-vscode-context='{"preventDefaultContextMenuItems": true }' onClick='((e) => {
        e.preventDefault();
        e.target.dispatchEvent(new MouseEvent("contextmenu", { bubbles: true, clientX: e.clientX, clientY: e.clientY }));
        e.stopPropagation();
    })(event)'>Create</button>
脚本和消息传递
Webview 就像 iframe 一样,这意味着它们也可以运行脚本。JavaScript 默认在 webview 中禁用,但可以通过传递 enableScripts: true 选项轻松重新启用。
让我们使用脚本添加一个计数器来跟踪我们的猫已编写的源代码行数。运行基本脚本非常简单,但请注意,此示例仅用于演示目的。实际上,您的 webview 应始终使用内容安全策略禁用内联脚本
import * as path from 'path';
import * as vscode from 'vscode';

export function activate(context: vscode.ExtensionContext) {
  context.subscriptions.push(
    vscode.commands.registerCommand('catCoding.start', () => {
      const panel = vscode.window.createWebviewPanel(
        'catCoding',
        'Cat Coding',
        vscode.ViewColumn.One,
        {
          // Enable scripts in the webview
          enableScripts: true
        }
      );

      panel.webview.html = getWebviewContent();
    })
  );
}

function getWebviewContent() {
  return `<!DOCTYPE html>
<html lang="en">
<head>
    <meta charset="UTF-8">
    <meta name="viewport" content="width=device-width, initial-scale=1.0">
    <title>Cat Coding</title>
</head>
<body>
    <img src="https://media.giphy.com/media/JIX9t2j0ZTN9S/giphy.gif" width="300" />
    <h1 id="lines-of-code-counter">0</h1>

    <script>
        const counter = document.getElementById('lines-of-code-counter');

        let count = 0;
        setInterval(() => {
            counter.textContent = count++;
        }, 100);
    </script>
</body>
</html>`;
}
哇!一只非常有生产力的猫。
Webview 脚本几乎可以执行普通网页上的任何脚本可以执行的操作。但请记住,webview 存在于自己的上下文中,因此 webview 中的脚本无法访问 VS Code API。消息传递就是为此而生的!
将消息从扩展传递到 webview
扩展可以使用 webview.postMessage() 将数据发送到其 webview。此方法将任何 JSON 可序列化的数据发送到 webview。消息通过标准的 message 事件在 webview 内部接收。
为了演示这一点,让我们为 Cat Coding 添加一个新命令,指示当前正在编码的猫重构他们的代码(从而减少总行数)。新命令 catCoding.doRefactor 使用 postMessage 将指令发送到当前 webview,并在 webview 内部使用 window.addEventListener('message', event => { ... }) 来处理消息
export function activate(context: vscode.ExtensionContext) {
  // Only allow a single Cat Coder
  let currentPanel: vscode.WebviewPanel | undefined = undefined;

  context.subscriptions.push(
    vscode.commands.registerCommand('catCoding.start', () => {
      if (currentPanel) {
        currentPanel.reveal(vscode.ViewColumn.One);
      } else {
        currentPanel = vscode.window.createWebviewPanel(
          'catCoding',
          'Cat Coding',
          vscode.ViewColumn.One,
          {
            enableScripts: true
          }
        );
        currentPanel.webview.html = getWebviewContent();
        currentPanel.onDidDispose(
          () => {
            currentPanel = undefined;
          },
          undefined,
          context.subscriptions
        );
      }
    })
  );

  // Our new command
  context.subscriptions.push(
    vscode.commands.registerCommand('catCoding.doRefactor', () => {
      if (!currentPanel) {
        return;
      }

      // Send a message to our webview.
      // You can send any JSON serializable data.
      currentPanel.webview.postMessage({ command: 'refactor' });
    })
  );
}

function getWebviewContent() {
  return `<!DOCTYPE html>
<html lang="en">
<head>
    <meta charset="UTF-8">
    <meta name="viewport" content="width=device-width, initial-scale=1.0">
    <title>Cat Coding</title>
</head>
<body>
    <img src="https://media.giphy.com/media/JIX9t2j0ZTN9S/giphy.gif" width="300" />
    <h1 id="lines-of-code-counter">0</h1>

    <script>
        const counter = document.getElementById('lines-of-code-counter');

        let count = 0;
        setInterval(() => {
            counter.textContent = count++;
        }, 100);

        // Handle the message inside the webview
        window.addEventListener('message', event => {

            const message = event.data; // The JSON data our extension sent

            switch (message.command) {
                case 'refactor':
                    count = Math.ceil(count * 0.5);
                    counter.textContent = count;
                    break;
            }
        });
    </script>
</body>
</html>`;
}
将消息从 webview 传递到扩展
Webview 也可以将消息传递回其扩展。这通过 webview 内部一个特殊的 VS Code API 对象上的 postMessage 函数来实现。要访问 VS Code API 对象,请在 webview 中调用 acquireVsCodeApi。此函数每个会话只能调用一次。您必须保留此方法返回的 VS Code API 实例,并将其分发给任何需要使用它的其他函数。
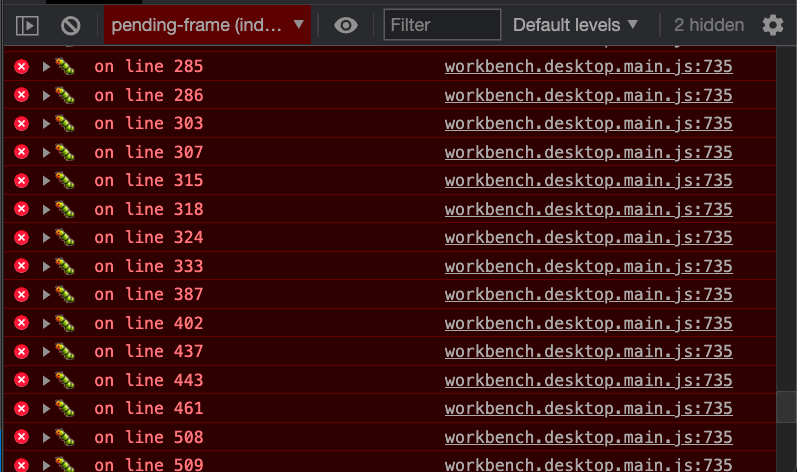
我们可以在 Cat Coding webview 中使用 VS Code API 和 postMessage,在猫在代码中引入 bug 时通知扩展
export function activate(context: vscode.ExtensionContext) {
  context.subscriptions.push(
    vscode.commands.registerCommand('catCoding.start', () => {
      const panel = vscode.window.createWebviewPanel(
        'catCoding',
        'Cat Coding',
        vscode.ViewColumn.One,
        {
          enableScripts: true
        }
      );

      panel.webview.html = getWebviewContent();

      // Handle messages from the webview
      panel.webview.onDidReceiveMessage(
        message => {
          switch (message.command) {
            case 'alert':
              vscode.window.showErrorMessage(message.text);
              return;
          }
        },
        undefined,
        context.subscriptions
      );
    })
  );
}

function getWebviewContent() {
  return `<!DOCTYPE html>
<html lang="en">
<head>
    <meta charset="UTF-8">
    <meta name="viewport" content="width=device-width, initial-scale=1.0">
    <title>Cat Coding</title>
</head>
<body>
    <img src="https://media.giphy.com/media/JIX9t2j0ZTN9S/giphy.gif" width="300" />
    <h1 id="lines-of-code-counter">0</h1>

    <script>
        (function() {
            const vscode = acquireVsCodeApi();
            const counter = document.getElementById('lines-of-code-counter');

            let count = 0;
            setInterval(() => {
                counter.textContent = count++;

                // Alert the extension when our cat introduces a bug
                if (Math.random() < 0.001 * count) {
                    vscode.postMessage({
                        command: 'alert',
                        text: '🐛  on line ' + count
                    })
                }
            }, 100);
        }())
    </script>
</body>
</html>`;
}
出于安全原因,您必须将 VS Code API 对象保密,并确保它永远不会泄露到全局作用域。
使用 Web Workers
Webview 支持 Web Workers,但有几个重要的限制需要注意。
首先,worker 只能使用 data: 或 blob: URI 加载。您不能直接从扩展文件夹加载 worker。
如果您确实需要从扩展中的 JavaScript 文件加载 worker 代码,请尝试使用 fetch
const workerSource = 'absolute/path/to/worker.js';

fetch(workerSource)
  .then(result => result.blob())
  .then(blob => {
    const blobUrl = URL.createObjectURL(blob);
    new Worker(blobUrl);
  });
Worker 脚本也不支持使用 importScripts 或 import(...) 导入源代码。如果您的 worker 动态加载代码,请尝试使用像 webpack 这样的打包器将 worker 脚本打包到单个文件中。
使用 webpack,您可以使用 LimitChunkCountPlugin 来强制编译后的 worker JavaScript 成为单个文件
const path = require('path');
const webpack = require('webpack');

module.exports = {
  target: 'webworker',
  entry: './worker/src/index.js',
  output: {
    filename: 'worker.js',
    path: path.resolve(__dirname, 'media')
  },
  plugins: [
    new webpack.optimize.LimitChunkCountPlugin({
      maxChunks: 1
    })
  ]
};
安全性
与任何网页一样,创建 webview 时,您必须遵循一些基本安全最佳实践。
限制功能
Webview 应具有所需的最低能力集。例如,如果您的 webview 不需要运行脚本,则不要设置 enableScripts: true。如果您的 webview 不需要从用户工作区加载资源,请将 localResourceRoots 设置为 [vscode.Uri.file(extensionContext.extensionPath)],甚至设置为 [] 来禁止访问所有本地资源。
内容安全策略
内容安全策略进一步限制了可在 webview 中加载和执行的内容。例如,内容安全策略可以确保只允许列表中允许的脚本在 webview 中运行,甚至可以告诉 webview 只通过 https 加载图像。
要添加内容安全策略,请在 webview 的 <head> 顶部放置一个 <meta http-equiv="Content-Security-Policy"> 指令
function getWebviewContent() {
  return `<!DOCTYPE html>
<html lang="en">
<head>
    <meta charset="UTF-8">

    <meta http-equiv="Content-Security-Policy" content="default-src 'none';">

    <meta name="viewport" content="width=device-width, initial-scale=1.0">

    <title>Cat Coding</title>
</head>
<body>
    ...
</body>
</html>`;
}
default-src 'none'; 策略禁止所有内容。然后,我们可以重新启用扩展运行所需的最低限度的内容。这是一个允许加载本地脚本和样式表,以及通过 https 加载图像的内容安全策略
<meta
  http-equiv="Content-Security-Policy"
  content="default-src 'none'; img-src ${webview.cspSource} https:; script-src ${webview.cspSource}; style-src ${webview.cspSource};"
/>
${webview.cspSource} 值是来自 webview 对象本身的占位符。有关如何使用此值的完整示例,请参阅 webview 示例。
此内容安全策略还隐式禁用了内联脚本和样式。最好将所有内联样式和脚本提取到外部文件中,以便它们可以被正确加载而不放松内容安全策略。
仅通过 https 加载内容
如果您的 webview 允许加载外部资源,强烈建议您仅允许通过 https 而不是 http 加载这些资源。上面的示例内容安全策略已通过只允许通过 https: 加载图像来实现此目的。
对所有用户输入进行消毒
与普通网页一样,在构建 webview 的 HTML 时,您必须对所有用户输入进行消毒。未能正确消毒输入可能会导致内容注入,从而可能使您的用户面临安全风险。
需要消毒的示例值
- 文件内容。
- 文件和文件夹路径。
- 用户和工作区设置。
考虑使用辅助库来构建 HTML 字符串,或至少确保用户工作区中的所有内容都经过适当的消毒。
切勿仅依靠消毒来保证安全。请务必遵循其他安全最佳实践,例如拥有内容安全策略以最小化任何潜在内容注入的影响。
持久化
在标准的 webview 生命周期中,webview 由 createWebviewPanel 创建,并在用户关闭它们或调用 .dispose() 时销毁。然而,webview 的内容在 webview 变得可见时创建,在 webview 移到后台时销毁。webview 中的任何状态都会在 webview 被移到后台选项卡时丢失。
解决此问题的最佳方法是使您的 webview 无状态。使用消息传递来保存 webview 的状态,然后在 webview 再次变得可见时恢复状态。
getState 和 setState
在 webview 中运行的脚本可以使用 getState 和 setState 方法来保存和恢复 JSON 可序列化的状态对象。即使 webview 面板隐藏时 webview 内容本身被销毁,此状态也会被保留。当 webview 面板被销毁时,状态也会被销毁。
// Inside a webview script
const vscode = acquireVsCodeApi();

const counter = document.getElementById('lines-of-code-counter');

// Check if we have an old state to restore from
const previousState = vscode.getState();
let count = previousState ? previousState.count : 0;
counter.textContent = count;

setInterval(() => {
  counter.textContent = count++;
  // Update the saved state
  vscode.setState({ count });
}, 100);
getState 和 setState 是持久化状态的首选方法,因为它们的性能开销远低于 retainContextWhenHidden。
序列化
通过实现 WebviewPanelSerializer,您的 webview 可以在 VS Code 重启时自动恢复。序列化建立在 getState 和 setState 的基础上,并且只有当您的扩展为您的 webview 注册了 WebviewPanelSerializer 时才启用。
为了使我们的编码猫在 VS Code 重启后仍能持久化,请首先在扩展的 package.json 中为 onWebviewPanel 添加一个激活事件
"activationEvents": [
    ...,
    "onWebviewPanel:catCoding"
]
此激活事件确保在 VS Code 需要恢复具有 catCoding 视图类型(viewType)的 webview 时,我们的扩展将被激活。
然后,在我们的扩展的 activate 方法中,调用 registerWebviewPanelSerializer 来注册一个新的 WebviewPanelSerializer。WebviewPanelSerializer 负责从其持久化状态恢复 webview 的内容。此状态是 webview 内容使用 setState 设置的 JSON 块。
export function activate(context: vscode.ExtensionContext) {
  // Normal setup...

  // And make sure we register a serializer for our webview type
  vscode.window.registerWebviewPanelSerializer('catCoding', new CatCodingSerializer());
}

class CatCodingSerializer implements vscode.WebviewPanelSerializer {
  async deserializeWebviewPanel(webviewPanel: vscode.WebviewPanel, state: any) {
    // `state` is the state persisted using `setState` inside the webview
    console.log(`Got state: ${state}`);

    // Restore the content of our webview.
    //
    // Make sure we hold on to the `webviewPanel` passed in here and
    // also restore any event listeners we need on it.
    webviewPanel.webview.html = getWebviewContent();
  }
}
现在,如果您在打开 cat coding 面板的情况下重新启动 VS Code,该面板将在相同的位置自动恢复。
retainContextWhenHidden
对于具有非常复杂 UI 或无法快速保存和恢复的状态的 webview,您可以使用 retainContextWhenHidden 选项。此选项使 webview 在隐藏时保留其内容,即使 webview 本身不再处于前台。
虽然 Cat Coding 几乎不能说有复杂的状态,但让我们尝试启用 retainContextWhenHidden 来看看该选项如何改变 webview 的行为
import * as vscode from 'vscode';

export function activate(context: vscode.ExtensionContext) {
  context.subscriptions.push(
    vscode.commands.registerCommand('catCoding.start', () => {
      const panel = vscode.window.createWebviewPanel(
        'catCoding',
        'Cat Coding',
        vscode.ViewColumn.One,
        {
          enableScripts: true,
          retainContextWhenHidden: true
        }
      );
      panel.webview.html = getWebviewContent();
    })
  );
}

function getWebviewContent() {
  return `<!DOCTYPE html>
<html lang="en">
<head>
    <meta charset="UTF-8">
    <meta name="viewport" content="width=device-width, initial-scale=1.0">
    <title>Cat Coding</title>
</head>
<body>
    <img src="https://media.giphy.com/media/JIX9t2j0ZTN9S/giphy.gif" width="300" />
    <h1 id="lines-of-code-counter">0</h1>

    <script>
        const counter = document.getElementById('lines-of-code-counter');

        let count = 0;
        setInterval(() => {
            counter.textContent = count++;
        }, 100);
    </script>
</body>
</html>`;
}
请注意,当 webview 被隐藏然后恢复时,计数器不会重置。无需额外代码!使用 retainContextWhenHidden,webview 的行为类似于 Web 浏览器中的后台标签页。脚本和其他动态内容即使在标签页不活动或不可见时也会继续运行。当启用 retainContextWhenHidden 时,您还可以向隐藏的 webview 发送消息。
尽管 retainContextWhenHidden 可能很有吸引力,但请记住,它具有很高的内存开销,并且仅在其他持久化技术无法奏效时才应使用。
辅助功能
在用户使用屏幕阅读器操作 VS Code 的上下文中,类 vscode-using-screen-reader 将添加到 webview 的主 body 中。此外,在用户选择减少窗口中动效偏好的情况下,类 vscode-reduce-motion 将添加到文档的主 body 元素中。通过观察这些类并相应地调整渲染,您的 webview 内容可以更好地反映用户的偏好。
后续步骤
如果您想了解更多关于 VS Code 可扩展性的信息,请尝试以下主题